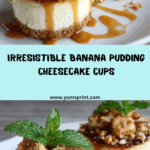
If you’ve been searching for a showstopping dessert that’s creamy, comforting, and joyfully easy, these Banana Pudding Cheesecake Cups are a must-make. Each spoonful is a glorious blend of silky cheesecake, luscious banana pudding, and that classic vanilla wafer crunch, layered together in single-serve cups for pure crowd-pleasing magic. Whether you’re hosting a party or just want a sweet treat for a quiet night in, these cups hit all the right nostalgic notes—no oven required!

Ingredients You’ll Need
The beauty of these Banana Pudding Cheesecake Cups is truly in their simplicity: every ingredient has a clear purpose and brings something wonderful to each layer, from the rich creaminess to that nostalgic cookie crunch!
- Vanilla wafer crumbs: These classic cookies form the buttery base and add the perfect touch of sweet crunch in every bite.
- Melted butter: Holds the crust together and adds richness and depth to the base layer.
- Cream cheese (softened): The hero of our creamy, tangy cheesecake layer—softening it ensures a smooth blend.
- Sweetened condensed milk: Sweetens the cheesecake filling and gives it a silky, decadent texture that’s impossible to resist.
- Vanilla extract: Just a splash makes all the layers feel warm and inviting, letting the banana flavor shine.
- Whipped cream: Gently folded in, it makes the cheesecake layer airy and light as a cloud.
- Prepared banana pudding: Choose homemade for a personal touch, or use store-bought for speed—either way, it adds that signature banana flavor.
- Ripe bananas (sliced): Fresh slices bring sweetness, gentle texture, and extra banana flavor to the mix.
- Optional toppings (whipped cream, extra wafer crumbs, banana slices): For a lovely finishing flourish and a touch of fun.
How to Make Banana Pudding Cheesecake Cups
Step 1: Build the Buttery Crust
Start by mixing your vanilla wafer crumbs with melted butter until every crumb is lightly coated and starting to stick together. Spoon a generous layer into the bottom of each cup or jar, pressing it down gently so it forms a sturdy base. This golden crust is the foundation for your dessert, providing crunch and a hint of nostalgia in every bite!
Step 2: Whip Up the Cheesecake Filling
In a mixing bowl, beat your softened cream cheese until it’s completely smooth and creamy—no lumps allowed! Blend in the sweetened condensed milk and vanilla extract, taking a moment to savor that heavenly aroma. Once combined, gently fold in the whipped cream to create a luscious, airy texture. This dreamy mixture goes right on top of your crust, creating that irresistible cheesecake layer for your Banana Pudding Cheesecake Cups.
Step 3: Layer with Banana Pudding and Slices
Now it’s time for the heart of this dessert: carefully spoon your prepared banana pudding over the cheesecake layer in each cup. Then, nestle a few slices of ripe banana right on top to add beautiful color, flavor, and extra creaminess. Each bite will taste just like your childhood banana pudding memories… with a cheesecake twist!
Step 4: Chill to Set
Pop your assembled cups into the refrigerator for at least two hours. This helps every layer set up beautifully, making the texture oh-so-creamy and spoonable. Plus, chilling gives the flavors time to meld together into one irresistible treat.
Step 5: Finish with Fun Toppings
Right before serving, pipe or dollop extra whipped cream on top, and sprinkle with more vanilla wafer crumbs or an extra slice of banana as a final flourish. This adds loads of charm and makes your Banana Pudding Cheesecake Cups pop with color and texture!
How to Serve Banana Pudding Cheesecake Cups

Garnishes
For the ultimate presentation, I love topping each cup with a big swirl of whipped cream, a sprinkle of wafer crumbs, and a fresh banana coin or two. It not only makes the cups look bakery-beautiful, but also adds little pops of flavor and crunch. Feel free to get creative—chopped nuts or a drizzle of caramel are lovely, too!
Side Dishes
Since these Banana Pudding Cheesecake Cups are delightfully rich and creamy, they pair well with lighter sides. Try setting out a fresh berry platter or slices of pineapple to brighten up your dessert table. For a Southern-inspired spread, add sweet iced tea and a tray of butter cookies to balance the flavors.
Creative Ways to Present
If you’re entertaining guests, layer the desserts in glass mason jars for rustic charm, or use fancy stemmed glasses to make date night extra special. For parties, mini plastic cups or shot glasses create perfect grab-and-go servings—adorably portioned and mess-free! You could even set up a DIY dessert bar, letting friends build their own perfect Banana Pudding Cheesecake Cups with a variety of toppings.
Make Ahead and Storage
Storing Leftovers
If you have any Banana Pudding Cheesecake Cups left over (which honestly doesn’t happen often!), just cover them tightly with plastic wrap or pop lids on your jars. They keep beautifully in the fridge for up to 3 days. The flavors actually get even better as they meld, but try to enjoy them soon for the freshest taste and texture.
Freezing
You can absolutely freeze these cheesecake cups if you want to prepare them far in advance. Simply assemble without the banana slice garnishes (add those after thawing), wrap each cup tightly, and freeze for up to 1 month. Thaw overnight in the refrigerator when you’re ready to serve, then garnish as if they were freshly made!
Reheating
No reheating needed—these are best enjoyed straight from the fridge! In case they’re super cold after freezing, just let them sit at room temperature for 10–15 minutes to take off the chill. The creamy layers will soften, making them extra irresistible.
FAQs
Can I use store-bought banana pudding in my Banana Pudding Cheesecake Cups?
Absolutely! Store-bought banana pudding works perfectly and saves you time. If you want to make your own, go for it—the flavors will be even fresher! Either option is delicious in these lovely cups.
What’s the best way to prevent bananas from browning?
To keep your banana slices looking bright, add them just before serving, or lightly toss them in a tiny bit of lemon juice right after slicing. This helps preserve their color and appeal!
Can I make Banana Pudding Cheesecake Cups ahead of time for a party?
Yes! You can assemble the cups (hold off on garnishes) up to a day in advance and store in the fridge. They’ll be perfectly set and ready for toppings and serving when the party starts.
Can I make these gluten-free?
Totally! Just use gluten-free vanilla wafer cookies for the crust, and double-check your other ingredients. The result will be just as delicious and perfect for guests with dietary needs.
What type of cups or jars should I use?
You can use anything from small mason jars and stemless wine glasses to disposable party cups or even teacups. Just make sure there’s enough space for all those luscious layers!
Final Thoughts
I can’t say enough about these Banana Pudding Cheesecake Cups—there’s just something magical about those dreamy layers and familiar flavors. I hope you’ll give them a try and make them your new go-to dessert for celebrations, potlucks, or whenever you need a little kitchen happiness. Enjoy every creamy, crunchy, banana-filled bite!