There’s absolutely nothing like a slice of classic Black Forest Cake Recipe to transport you right into the heart of Germany’s Black Forest region, where every bite is an irresistible harmony of rich chocolate, luscious cherries, and clouds of whipped cream. The blend of bittersweet cocoa, tart fruit, and sweet, billowy cream wrapped up in a showstopping, chocolate-shaved masterpiece is pure celebration on a plate. Whether you’re baking for a special occasion or simply craving a comforting, old-world treat, this Black Forest Cake Recipe will quickly become a favorite in your home—and you’ll love how every step turns ordinary ingredients into something truly enchanting.

Ingredients You’ll Need
Don’t be intimidated by the elegant appearance—this Black Forest Cake Recipe calls for everyday, accessible ingredients that play essential roles in building flavor and texture, layer by glorious layer. Each one is chosen to support the richness, moisture, and delightful contrasts that make this cake unforgettable.
- Eggs: Room temperature, separated—this is your secret to a feather-light sponge cake, so don’t skip the separation step!
- Sugar: Lends delicate sweetness and helps stabilize your whipped eggs for an extra-tender crumb.
- All-purpose flour: A pantry staple providing the structure every great sponge cake needs.
- Cocoa powder (unsweetened): Choose a good-quality cocoa for a deep, chocolatey flavor that’s the backbone of the Black Forest Cake Recipe.
- Baking powder: Just a touch, to lift and lighten the sponge.
- Salt: A pinch brightens and balances the chocolate notes—never underestimate this tiny but mighty addition.
- Melted butter: Keeps the cake extra moist and adds rich flavor.
- Sour cherries (jarred, drained, juice reserved): Classic and tangy; the cherries provide the characteristic juicy zing that defines this cake.
- Sugar (for cherry filling): Draws out the cherries’ flavor and builds the perfect jammy consistency.
- Cornstarch: A thickener for the cherry compote, helping to set those gorgeous layers.
- Kirsch (cherry brandy, optional): A traditional German touch that heightens the cherry aroma—skip if you prefer an alcohol-free dessert.
- Heavy whipping cream (cold): For those signature fluffy, dreamy layers and all-over coating.
- Powdered sugar: Sweetens and stabilizes the whipped cream ever so gently.
- Vanilla extract: Adds warmth and depth to the cream filling.
- Cream stabilizer (optional): Ensures the whipped cream holds its shape—especially handy on warm days or for make-ahead prep.
- Dark chocolate shavings: For decoration and that elegant, irresistible hint of bitter chocolate crunch on every bite.
- Fresh cherries (with stems if possible): The jewel-like finishing touch—completely classic, completely stunning.
How to Make Black Forest Cake Recipe
Step 1: Prepare and Bake the Chocolate Sponge
Start by preheating your oven to 175°C (350°F). It’s so important to grease and line your cake pans well—this guarantees your beautiful sponge layers will release easily. Next, separate your eggs, and whip the yolks with sugar until the mixture reaches a pale, fluffy nirvana. Meanwhile, sift together your dry ingredients to avoid lumps and keep the cake ultra-light. Whip those egg whites until they reach stiff peaks, then gently fold everything together, finishing with the melted butter for extra tenderness. Divide the batter between your pans, bake until just set and springy, then allow to cool before carefully slicing each cake in half to create four delicate layers.
Step 2: Make the Cherry Filling
While the sponge is cooling, it’s time to build your flavorful cherry layer. In a saucepan, whisk together the reserved cherry juice, sugar, and cornstarch, then gently heat until it thickens into a glossy, vibrant syrup. Stir in the drained cherries, letting them plump up and soak in that sweetness; pour in a splash of Kirsch if you’re feeling extra authentic. Just two more minutes of simmering and your cherry filling is ready—allow it to cool so it won’t melt your cream later.
Step 3: Whip the Cream to Perfection
There’s something so satisfying about whipping up fresh cream for this Black Forest Cake Recipe. Use cold heavy whipping cream, add powdered sugar and vanilla, and beat until you see soft peaks. If you’re making this cake ahead or worried about your cream deflating, add a packet of stabilizer—this keeps those billowy rosettes tall and proud. Don’t overwhip; you want your cream cloud-like and smooth.
Step 4: Assemble the Showstopper
Finally, the magic moment! Place your first sponge layer on a serving platter, brush generously with cherry syrup, then make it snow with a thick layer of whipped cream. Spoon over some cherry filling—making sure each bite will burst with flavor. Repeat this dreamy routine: sponge, syrup, cream, cherries. Once your final sponge layer is in place, cover the whole cake with a snowy blanket of whipped cream, making sure to get the sides as smooth as possible for a classic look.
Step 5: Decorate with Flair
Here’s where you get to channel your inner pastry chef. Press dark chocolate shavings around the sides and over the top for that signature look. If you’re feeling extra, use a piping bag to create swirls or rosettes of whipped cream around the edge, and crown each swirl with a fresh cherry. There’s nothing like seeing the Black Forest Cake Recipe come to life, ready for its close-up—or its first greedy forkful.
How to Serve Black Forest Cake Recipe

Garnishes
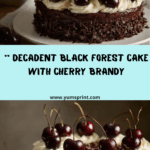
The most iconic garnish for the Black Forest Cake Recipe is a generous shower of dark chocolate shavings and glossy, fresh cherries perched atop each piped swirl of cream. The contrast both in appearance and flavor can’t be beat—it makes every slice a total showpiece at the dessert table.
Side Dishes
If you’re planning a festive spread, this cake shines alongside light sides: a bowl of fresh berries, a mug of dark coffee, or even a little dollop of cherry compote on the plate. The rich flavors and textures pair beautifully with something simple and tangy to balance all that indulgence.
Creative Ways to Present
For a fun twist, try assembling the Black Forest Cake Recipe as mini individual cakes or even layered in glasses for a gorgeous trifle effect. If you’re serving for a special occasion, edible gold leaf or a dusting of cocoa powder can give your cake an extra dose of drama while still keeping that classic appeal.
Make Ahead and Storage
Storing Leftovers
Because of its whipped cream and fruit layers, the Black Forest Cake Recipe is best kept chilled. Cover leftover slices with plastic wrap or store in an airtight container, then refrigerate for up to three days. The cake will stay moist, with the flavors melding beautifully with time.
Freezing
If you want to get ahead, you can freeze the sponge cakes (unfilled) for up to one month. Assemble the cake fresh for best results, as whipped cream doesn’t freeze well. However, if you have leftover assembled cake, wrap snugly and freeze for up to two weeks—just note that texture may soften a bit on thawing.
Reheating
This cake is best enjoyed cold, straight from the fridge, so reheating isn’t necessary. If you’ve frozen leftover pieces, simply thaw in the refrigerator overnight or on the counter for an hour or so before serving—no oven required!
FAQs
What if I can’t find sour cherries?
No worries! You can use canned sweet cherries or even frozen cherries—just reduce the added sugar to balance out the sweetness. It’ll still taste amazing, though sour cherries do give the Black Forest Cake Recipe its signature tang.
Can I make the Black Forest Cake Recipe without alcohol?
Absolutely! The Kirsch is traditional, but you can skip it for an alcohol-free dessert—just use a little extra cherry juice, and the cake will be just as delicious and kid-friendly.
How do I keep my whipped cream from melting?
Start with cold cream, and if it’s a hot day or you’re prepping in advance, add a packet of cream stabilizer. Chill your mixing bowl and beaters ahead of time for extra insurance against rapid melting—that way your Black Forest Cake Recipe will stay pristine!
Can I make the cake layers in advance?
Definitely! Bake the sponge cakes, let them cool completely, and wrap tightly in plastic wrap. They’ll stay fresh at room temperature for a couple days, or you can freeze them and assemble the cake when you’re ready.
What’s the best way to slice the finished cake?
Use a long, sharp knife and dip it in hot water between cuts for those clean, bakery-style slices. Wipe the knife between each slice to keep layers neat—the result is gorgeous, tidy servings that let all that hard work shine through.
Final Thoughts
If you’re looking to impress or simply treat yourself to something spectacular, this Black Forest Cake Recipe is a guaranteed crowd-pleaser with its stunning looks and decadent layers. Try it once, and you’ll find yourself returning to this recipe again and again for birthdays, holidays, or any day that could use a little joy—and chocolate!