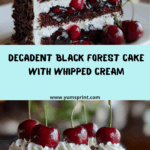
If you’ve ever dreamed of a slice of cake that balances deep chocolate layers, fluffy whipped cream, and the bright pop of cherries, Black Forest Cake is the masterpiece you’ve been waiting for. The combination of tender cocoa cake, luscious cherry filling, billows of cream, and a shower of dark chocolate shavings delivers a sophisticated dessert with playful charm. Whether you’re celebrating a milestone or just treating yourself on a quiet evening, this classic German confection is pure indulgence from the very first bite.

Ingredients You’ll Need
Baking Black Forest Cake is about a few simple ingredients that magically come together in the most decadent way. Each component is essential, creating that harmonious blend of sweet, tart, rich, and creamy that defines this beloved dessert.
- All-purpose flour: Provides the base structure for those soft, moist cake layers.
- Unsweetened cocoa powder: Choose a good-quality cocoa to give your cake its deep, chocolatey heart.
- Granulated sugar: Sweetens the cake and keeps it wonderfully tender.
- Baking powder and baking soda: Essential for a tall, fluffy crumb—both are needed for balance.
- Salt: Just a pinch to brighten up every flavor in the cake.
- Large eggs: Help the cake batter hold together beautifully while providing richness.
- Vegetable oil: Keeps the layers extra moist and yielding.
- Buttermilk: Lends a subtle tang and ensures the cake stays melt-in-your-mouth soft.
- Vanilla extract: Brings a warmth and extra layer of flavor, both in the cake and whipped cream.
- Hot coffee: Intensifies the chocolate flavor and helps make the batter dreamy and light.
- Fresh or canned cherries: Tart cherries are stars of the show, bursting through each layer; save a few perfect ones for the topping.
- Cherry liqueur (Kirsch) or cherry juice: Adds that authentic Black Forest zing—Kirsch if you’re feeling classic, juice if you want family-friendly.
- Heavy whipping cream: Whips up impossibly fluffy to create the classic frosting and filling.
- Powdered sugar: Sweetens the whipped cream without any grittiness.
- Dark chocolate (for shaving): Finishing with shaved chocolate means extra decadence and a gorgeous textured look.
How to Make Black Forest Cake
Step 1: Prepare Your Cake Pans and Oven
Begin by heating your oven to 175°C (350°F). Grease two 9-inch round cake pans and line them with parchment—this is your insurance for easy release, ensuring every layer stays picture-perfect.
Step 2: Mix the Cake Batter
In a large mixing bowl, whisk together the flour, cocoa powder, granulated sugar, baking powder, baking soda, and salt. Add the eggs, oil, buttermilk, and vanilla extract. Beat until the mixture is silky and smooth. Now, gently stir in the hot coffee. The batter will be loose, but that’s the secret to those soft, moist layers.
Step 3: Bake the Chocolate Layers
Divide your batter evenly between the prepared pans and slide them into the oven. Bake for 30 to 35 minutes, or until a toothpick inserted into the center comes out clean (don’t overbake, or you’ll lose that dreamy texture). Let the cakes cool completely before moving to the next step.
Step 4: Create the Cake Layers
Carefully slice each cake horizontally to create two thin rounds from each, giving you a grand total of four cake layers. If you’re new to cake slicing, use a long serrated knife and work slowly for even results. Brush each layer with cherry liqueur (Kirsch) or cherry juice. This little soak infuses the cakes with a burst of cherry flavor, echoing the essence of a true Black Forest Cake.
Step 5: Whip the Cream
Pour the heavy cream into a chilled bowl, then add the powdered sugar and a touch of vanilla extract. Whip it until stiff peaks form—it should be pillowy but hold its shape firmly. This whipped cream is what gives each bite that signature lightness.
Step 6: Assemble Your Black Forest Cake
Place your first cake layer on a pretty serving plate and spread a generous layer of whipped cream on top, followed by a scatter of cherries. Repeat this layering process with the remaining cake, cream, and cherries, building up your showstopper. Finish by covering the entire cake with the rest of the whipped cream, using a spatula for billowy swirls.
Step 7: Decorate and Chill
Generously adorn the cake with chocolate shavings and arrange a handful of whole cherries on top for a flourish. Refrigerate the assembled cake for at least an hour (or up to overnight) to let the flavors meld and the cream set. Now, just try to resist sneaking a slice ahead of time!
How to Serve Black Forest Cake

Garnishes
To give your Black Forest Cake that irresistible “bakery window” look, always finish with a tumble of dark chocolate shavings and a crown of glossy cherries on top. If you’re feeling extra, sprinkle a little powdered sugar right before serving—your guests will swoon.
Side Dishes
A slice of Black Forest Cake is quite the showstopper on its own, but if you want to create a full dessert experience, try pairing it with tart cherry compote, a scoop of vanilla bean ice cream, or a cup of rich espresso. Each pairing will accentuate the cake’s intense chocolate and bright cherry notes.
Creative Ways to Present
For a playful twist, try serving mini trifles layered in glasses or slicing the cake into petite squares for an elegant dessert platter. You can also assemble your Black Forest Cake in a tall trifle bowl or jar—perfect for picnics or parties where you want a little wow factor without the fuss of slicing.
Make Ahead and Storage
Storing Leftovers
Wrap any leftover Black Forest Cake snugly with plastic wrap or store it in an airtight container in the fridge. The cake stays wonderfully fresh and moist for up to three days, making it perfect for savoring every last slice.
Freezing
If you need to plan further ahead, you can freeze fully assembled Black Forest Cake or just the baked cake layers. For the assembled cake, freeze individual slices on a tray, then wrap tightly in plastic and store in a zippered bag. Defrost overnight in the refrigerator before indulging.
Reheating
Black Forest Cake is best enjoyed chilled or at room temperature, so there’s no need to reheat it. Simply remove your slice from the fridge about 15 minutes before serving, and it will be just right!
FAQs
Can I make Black Forest Cake without alcohol?
Absolutely! Simply substitute cherry liqueur with unsweetened cherry juice for the syrup—your cake will still capture all the signature flavors while keeping it friendly for all ages.
What’s the best way to get even cake layers?
Use a long serrated knife and rotate the cake slowly as you slice, or try a dedicated cake slicer. It can help to lightly mark the halfway point all the way around before committing to the final cut.
Can I use frozen cherries instead of fresh?
Yes, frozen cherries work brilliantly if fresh are out of season. Thaw them first, drain off excess liquid, and pat them dry before using to keep the layers from getting soggy.
Is there a substitute for buttermilk?
If you don’t have buttermilk handy, make your own by stirring one tablespoon of lemon juice or vinegar into 240 ml of milk. Let it sit for five minutes, and you’re ready to go!
How far in advance can I assemble the cake?
You can assemble Black Forest Cake up to a day ahead—just keep it chilled. The flavors actually deepen as it rests, so it’s a wonderful make-ahead dessert for special occasions.
Final Thoughts
There’s simply nothing like the magic of a homemade Black Forest Cake to bring people together. Whether you’re baking it for a gathering or as a treat for yourself, each luscious layer is guaranteed to delight. Give it a try and enjoy every decadent, cherry-studded bite—you might just start a new tradition!