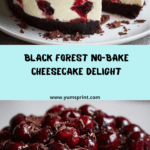
If you’re looking to wow at your next gathering, you simply can’t go wrong with Black Forest Cheesecake Bliss. This luscious, no-bake cheesecake brings together a thick Oreo-chocolate cookie crust, a cloud-like vanilla cream cheese filling, sweet cherries, and a dramatic crown of chocolate curls. Each bite is a celebration of flavor and texture, making this dessert both a stunning centerpiece and an irresistible indulgence. It’s got all the nostalgia of classic Black Forest cake, but with a fresh, modern cheesecake twist.
Ingredients You’ll Need

Ingredients You’ll Need
Let’s talk ingredients! Everything you need for Black Forest Cheesecake Bliss might already be in your kitchen, and each serves its own special purpose. The contrasting flavors and textures are what make this dessert legendary, so don’t skip a thing.
- Crushed Chocolate Cookies: The rich, chocolatey base sets the tone for the whole cheesecake—Oreos or chocolate digestives work wonders.
- Melted Butter: Just enough to bind those cookie crumbs together, giving you a firm, buttery crust.
- Cream Cheese: The heart of your cheesecake layer, lending that signature creaminess and tang.
- Powdered Sugar: This sweetens the cream cheese gently and melts right in—no grainy textures allowed!
- Vanilla Extract: A splash of vanilla enhances every other flavor, making the filling taste even more luxurious.
- Whipped Cream or Cool Whip: Folds into the filling to create a cloud-soft, airy texture that’s pure bliss.
- Cherry Pie Filling or Fresh Cherry Compote: The star of your cherry layer—either works, and both bring a bold, fruity punch.
- Fresh Black and Red Cherries: For piling up on top—these add freshness and a juicy pop.
- Dark Chocolate Curls or Shavings: The finishing touch for drama and deep chocolate flavor in every forkful.
How to Make Black Forest Cheesecake Bliss
Step 1: Create the Chocolate Cookie Crust
Start by crushing your favorite chocolate cookies into fine crumbs—think rich Oreos or buttery digestives. Mix these crumbs with melted butter and press them firmly into a springform pan to form a thick, even base. The chill in the fridge for 15 minutes sets everything, ensuring your crust stays perfectly crisp as it supports all those luscious layers.
Step 2: Whip Up the Cheesecake Layer
In a large bowl, beat the cream cheese until it’s smooth and creamy. Sprinkle in the powdered sugar and a dash of vanilla extract, whipping it all together until silky. Now, gently fold in the whipped cream (or Cool Whip) to lighten up the filling. What you get is an unbelievably airy mixture that just begs to be spooned over your crust.
Step 3: Layer and Chill
Spread your cream cheese filling generously over the chilled chocolate crust, using a spatula to create an even, inviting layer. Pop the pan back in the fridge for an hour—this allows everything to firm up for that perfect slice later.
Step 4: Add the Cherry Topping
After the cheesecake layer has had time to set, spoon over your cherry pie filling or fresh cherry compote. Spread it out to the very edges for maximum cherry coverage and brilliant color.
Step 5: Finish with Cherries and Chocolate
Pile on a delicious mix of fresh black and red cherries right on top of the cherry layer. Finish things off by showering your masterpiece with dark chocolate curls or shavings. Then, let everything chill for another 3 to 4 hours until it’s firm enough to slice. Now, you have a Black Forest Cheesecake Bliss ready to impress!
How to Serve Black Forest Cheesecake Bliss

Garnishes
The beauty of Black Forest Cheesecake Bliss is how easily you can dress it up! Try a few extra fresh cherries on top, a light dusting of powdered sugar for elegance, or a sprinkle of finely chopped pistachios for color and crunch. Don’t hold back on those chocolate curls—they’re both stunning and absolutely crave-worthy!
Side Dishes
This decadent dessert really shines solo, but it’s wonderful served alongside a hot cup of dark coffee or strong espresso. If you want something lighter, consider pairing it with a tangy lemon sorbet or a simple scoop of vanilla ice cream—the contrast highlights the rich flavors in every bite.
Creative Ways to Present
For parties, try slicing the cheesecake into elegant bars or squares for easy, grab-and-go servings. You could also layer the elements in jars for a picnic-style treat, or make mini cheesecakes in muffin tins for individual portions. No matter how you serve it, Black Forest Cheesecake Bliss always wows the crowd!
Make Ahead and Storage
Storing Leftovers
Leftover Black Forest Cheesecake Bliss will keep beautifully in the fridge. Just cover your pan with plastic wrap or transfer slices to an airtight container, and enjoy within 3 to 4 days for peak freshness and flavor.
Freezing
This no-bake delight also freezes like a dream! Slice the cheesecake, wrap each piece tightly in plastic wrap, then foil, and store in the freezer for up to 1 month. When you’re ready to indulge, thaw slices overnight in the fridge.
Reheating
There’s no need to reheat Black Forest Cheesecake Bliss—it’s best served chilled. If it’s been frozen, simply let it thaw completely in the refrigerator to ensure that wonderfully creamy texture.
FAQs
Can I use homemade cherry compote instead of canned filling?
Absolutely! Homemade cherry compote adds a fresher, more vibrant flavor to Black Forest Cheesecake Bliss. Just simmer fresh or frozen cherries with a splash of lemon and a bit of sugar, then cool before layering—they’ll taste incredible on the creamy base.
Do I have to use a springform pan?
While a springform pan makes it super easy to get perfect slices of your Black Forest Cheesecake Bliss, you can use a deep pie dish or even individual jars if you prefer. Just be sure to line or grease your pan for easy removal.
What’s the best way to make chocolate curls?
The secret is using a bar of good quality dark chocolate and a vegetable peeler. Gently scrape the edge of the chocolate for beautiful, ribbon-like curls to top your Black Forest Cheesecake Bliss—easy and elegant!
Can I make this cheesecake gluten-free?
Definitely! Swap in your favorite gluten-free chocolate cookies for the crust to keep all the deliciousness without the gluten. The rest of the recipe is naturally gluten-free.
Can I add a little cherry liqueur for extra flavor?
Yes, and it’s a delightful adult twist! Try adding a tablespoon of cherry liqueur to your cream cheese filling. It’ll give your Black Forest Cheesecake Bliss an extra pop of sophistication that’s sure to impress guests.
Final Thoughts
Give yourself the joy of making (and sharing!) Black Forest Cheesecake Bliss. Every slice is a celebration of smooth, fruity, and chocolatey flavor, and it’s so simple anyone can master it. Gather your friends, set the table, and prepare to watch this dreamy dessert disappear in minutes!