If you’re looking to indulge in a showstopping dessert that will have everyone at the table swooning, this Black Forest Chocolate Cake** is the recipe you’ve been waiting for. Sometimes you need a little decadence in your life, and this cake delivers it in spades: layers of rich, moist chocolate cake, as dark as midnight and impossibly tender, drenched with sweet-tart cherries and cloaked in a cloud of billowy chocolate frosting, all crowned with glossy chocolate ganache and a bounty of fresh berries. It’s the ultimate treat for chocolate lovers and a guaranteed centerpiece at any special celebration.

Ingredients You’ll Need
Even though this stunning cake might look bakery-worthy, every ingredient is purposeful and straightforward. Each adds a layer of flavor, richness, or visual flair to your Black Forest Chocolate Cake**, so don’t skip or swap if you want to experience the magic in every bite!
- All-purpose flour: Gives structure to the cake and helps the layers hold together beautifully.
- Granulated sugar: Sweetens the batter and ensures a soft crumb.
- Unsweetened cocoa powder: The star of the show, lending that intense chocolate flavor and deep color.
- Baking soda and baking powder: Work together to give the cake its tall, airy lift.
- Salt: Just a pinch heightens every other flavor in the cake.
- Buttermilk (room temperature): Adds tang and tenderness to the crumb for a melt-in-your-mouth result.
- Strong brewed coffee (hot): Intensifies the chocolate flavor, making each bite extra decadent.
- Vegetable oil: Keeps the cake exceptionally moist, ensuring it tastes fresh for days.
- Large eggs (room temperature): Bind the batter and add richness to the cake.
- Vanilla extract: Deepens all the other flavors and adds a lovely aromatic note.
- Cherry pie filling: Brings the signature fruity contrast and classic Black Forest tang.
- Unsalted butter (softened): The base for a whipped, creamy chocolate frosting.
- Powdered sugar: Makes the frosting sweet and ultra-smooth.
- Heavy cream: Used in both the frosting and ganache for richness and a dreamy, silky texture.
- Pinech of salt: Balances the sweetness in the frosting.
- Semi-sweet chocolate chips: The core of the glossy, decadent ganache.
- Fresh blackberries and raspberries: Add a jewel-toned, tart accent on top of your finished Black Forest Chocolate Cake**.
- Fresh cherries: A nod to tradition, they make the cake look festive and luxurious.
- Sprinkles or chocolate shavings: The finishing touch that makes your creation look downright irresistible.
How to Make Black Forest Chocolate Cake**
Step 1: Bake the Chocolate Cake Layers
Preheat your oven to 175°C (350°F) and prepare two 8-inch round cake pans by greasing and flouring them. In a large bowl, whisk the flour, sugar, cocoa, baking soda, baking powder, and salt together—you want those dry ingredients perfectly combined for an even crumb. In a separate bowl, whisk up buttermilk, hot coffee, oil, eggs, and vanilla. Pour the wet mix into the dry and stir gently until just blended (the batter will look runny, and that’s exactly right). Divide the batter between the pans and bake for 30–35 minutes until a toothpick comes out clean. Cool the cakes in the pans for 10 minutes before transferring to a wire rack. Once cooled, carefully slice each round in half horizontally, so you have four slim, stackable layers.
Step 2: Whip Up the Chocolate Frosting
In a large bowl, use a stand mixer or hand mixer to beat together the softened butter and cocoa powder until creamy and smooth—it will smell incredible! Add powdered sugar in cupfuls, mixing at low speed to keep things neat. Once blended, pour in the heavy cream, vanilla, and a pinch of salt. Whip everything up on medium-high until your frosting is fluffy and light, ready to spread.
Step 3: Assemble the Black Forest Chocolate Cake**
Set your first cake layer on a serving platter and spread a thin layer of chocolate frosting over it, followed by a generous spoonful of cherry pie filling. Layer on the next cake round and repeat, finishing with your fourth layer on top. Use the remaining frosting to cover the entire cake, smoothing the sides and top however you like. Chill the cake in the fridge for at least 30 minutes—this sets the frosting and makes the next step a breeze.
Step 4: Prepare the Chocolate Ganache
In a microwave-safe bowl, combine your chocolate chips and heavy cream. Microwave in 30-second bursts (stirring each time) until melted and glossy. Let the silky ganache cool just a bit, about 10 minutes, so it’s thick but still pourable.
Step 5: Finish, Garnish, and Serve
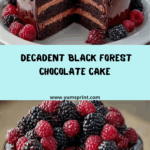
Pour the ganache over your chilled cake, letting it drip luxuriously down the sides. Don’t rush this—it’s pure magic watching the shiny chocolate flow! Top with fresh blackberries, raspberries, and cherries for a stunning color contrast. Finally, shower a handful of chocolate shavings or festive sprinkles on top. Slice and serve with pride!
How to Serve Black Forest Chocolate Cake**

Garnishes
When it comes to topping a Black Forest Chocolate Cake**, let your creativity take the lead. Classic fresh cherries are a must, but a tumble of blackberries and raspberries makes your cake look even more dramatic and inviting. Chocolate shavings, curls, or a scattering of sprinkles add both elegance and crunch. If you want an extra sparkle, a dusting of powdered sugar right before serving turns your creation into a snowy delight.
Side Dishes
Since this cake is rich and chocolate-packed, pair it with something fresh and light: a bowl of mixed berries, a scoop of vanilla bean ice cream, or even a little unsweetened whipped cream. A cup of hot black coffee or an espresso cuts through the sweetness and rounds out the experience perfectly. If feeling fancy, a glass of cherry liqueur or a splash of Amaretto on the side is truly celebratory!
Creative Ways to Present
Try building your Black Forest Chocolate Cake** as a naked cake, leaving the sides exposed so the layers and filling peek through. Love mini desserts? Make individual layered cakes or trifles in glass jars for parties. You can even turn this recipe into elegant cupcakes, topping each one with a drizzle of ganache, a cherry, and chocolate curls for easy sharing (and guaranteed smiles!).
Make Ahead and Storage
Storing Leftovers
Keep any leftover Black Forest Chocolate Cake** in an airtight container in the fridge, where it will stay moist and delicious for up to four days. The cake actually tastes even better after a day as all the flavors mingle, so don’t worry if you have extra slices!
Freezing
You can absolutely freeze this cake! For best results, slice it into individual portions and wrap each piece tightly in plastic wrap, then place them in a freezer-safe bag or container. The cake will keep perfectly for up to two months. Thaw in the fridge overnight before serving.
Reheating
If you crave a warm slice, remove your portion from the fridge, then let it come to room temperature or pop it in the microwave for about 10–15 seconds. Be gentle with the heat—just enough to soften the ganache and bring out the cake’s irresistible fudginess.
FAQs
Can I make the cake layers in advance?
Yes! You can bake the cake layers a day or two ahead. Let them cool completely, wrap tightly in plastic wrap, and refrigerate until ready to assemble. This can actually make assembly even easier.
What’s the best way to slice a Black Forest Chocolate Cake** neatly?
For clean, beautiful slices, use a long, sharp, serrated knife. Wipe the blade with a warm cloth between cuts to keep the layers distinct and the ganache smooth.
Can I use homemade cherry filling instead of canned?
Absolutely! If you have fresh or frozen cherries and a little time, a homemade cherry compote brings a lovely tang and fruitier flavor. Just ensure it’s thick enough to stay put between the cake layers.
Do I have to use coffee in the cake batter?
No worries if you’re not a coffee fan—the coffee simply enhances the chocolate depth and won’t make the cake taste like coffee. You can substitute hot water if you prefer, but we promise, even skeptics love the end result.
Can this recipe be baked as cupcakes?
Definitely! Divide the batter among cupcake liners and bake for about 18–22 minutes. Fill and frost as directed, then garnish each cupcake with ganache, fruit, and decorations for an adorable twist on Black Forest Chocolate Cake**.
Final Thoughts
Once you try this Black Forest Chocolate Cake**, you’ll be looking for any excuse to make it again—whether it’s for a birthday, holiday, or just an average Tuesday. Each slice feels like a celebration, and I can’t wait for you to share it with your friends and family. Give it a try and let it become a new classic at your own table!