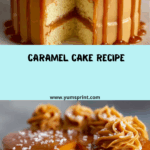
If you crave a luscious dessert that makes every special occasion just a bit sweeter, this Caramel Cake Recipe will absolutely win your heart. Imagine tender, buttery cake layers sandwiched and smothered in a dreamy, house-made caramel filling and frosting. Every bite melts in your mouth, offering an irresistible combination of rich caramel, moist crumb, and a balanced, not-too-sweet finish. Whether it’s a family celebration, a backyard barbecue, or just a Wednesday that needs some sparkle, this is one dessert that everyone will talk about for days!

Ingredients You’ll Need
The beauty of this Caramel Cake Recipe lies in its simplicity. You don’t need fancy or hard-to-find ingredients—just a handful of pantry and fridge staples, each one essential for building that perfect, nostalgic flavor and melt-in-your-mouth texture.
- All-purpose flour (3 cups): The sturdy-yet-tender foundation for the cake, making every bite soft and fluffy while keeping its shape.
- Baking powder (2 ½ tsp): This helps the layers rise, giving them a gentle lift and irresistible lightness.
- Baking soda (½ tsp): A touch of baking soda boosts browning and keeps the cake ultra-tender.
- Salt (½ tsp): Just enough to bring out the deep caramel and buttery notes without overpowering sweetness.
- Unsalted butter (1 cup + ½ cup): Rich, creamy, and absolutely essential—used in both the cake and the caramel for flavor and moisture.
- Granulated sugar (4 cups): Sweetens the cake and creates that glorious, golden caramel frosting and filling.
- Eggs (4 large): These bind everything together, help the cake rise, and add richness.
- Vanilla extract (3 tsp): Adds a gentle aroma and warmth in both the batter and caramel.
- Buttermilk (1 ½ cups): The secret to moist, tender cake with just a hint of tanginess.
- Heavy cream (1 cup): This takes the caramel filling over the top, making it velvety and oh-so-spreadable.
How to Make Caramel Cake Recipe
Step 1: Prepare and Preheat
First things first—preheat your oven to 350°F (175°C) and get those cake pans ready. Line and grease three 8-inch round pans, making sure every corner is covered so your cakes release beautifully. Doing this ahead saves time and makes cake assembly a breeze later on.
Step 2: Mix Dry Ingredients
In a large bowl, whisk together your flour, baking powder, baking soda, and salt. This step might seem basic, but getting an even blend ensures your cake bakes up light, even, and full of cloud-like crumb.
Step 3: Cream Butter and Sugar
Place the softened butter and sugar in a separate bowl and beat until light and fluffy. Don’t rush this step—creaming introduces air into the batter, guaranteeing a tender cake. Once fluffy, add in your eggs one at a time, blending well, and then add vanilla for that extra hint of warmth.
Step 4: Combine Wet and Dry Ingredients
Now, alternate adding the dry mixture and buttermilk to your butter mix, starting and ending with the dry ingredients. This approach keeps your batter silky and ensures a tender crumb. Go slow and mix just until combined—overmixing is the enemy of fluffy cake!
Step 5: Bake the Cake Layers
Divide the batter evenly between your prepared pans. Pop them in the oven and bake for 25–30 minutes until a toothpick comes out clean and the tops are golden. Let the cakes cool in the pans for about 10 minutes, then gently turn them out onto a wire rack to cool completely. The anticipation will build, but it’s worth the wait!
Step 6: Make the Caramel Filling & Frosting
Ready for a little magic? In a heavy saucepan, melt the sugar over medium heat until it turns a glorious amber. Don’t walk away—keep an eye out, as caramel turns quickly! Stir in the butter, then slowly (and carefully!) pour in the heavy cream. The mixture will bubble, so keep whisking. Remove from heat, stir in vanilla and salt, and let it cool until thickened but still spreadable. This glorious caramel is the soul of our Caramel Cake Recipe!
Step 7: Assemble the Cake
Place your first cake layer on a serving plate. Generously spread a layer of caramel filling, then repeat with the second layer. Place the third on top and lavish the entire cake with caramel frosting. For a final flourish, drizzle any extra caramel over the top and decorate with your favorite touches.
How to Serve Caramel Cake Recipe

Garnishes
The best part of serving this Caramel Cake Recipe is styling it with a bit of flair! Consider a light sprinkle of flaky sea salt over the caramel for subtle crunch and contrast. Edible gold leaf or a dusting of powdered sugar is lovely for celebrations. A few pecan halves or candied nuts around the edge never hurt, either.
Side Dishes
Pair a generous slice of caramel cake with a scoop of vanilla bean ice cream or a dollop of lightly whipped cream to cut the richness. For a touch of fruitiness, serve with fresh berries or a quick berry compote—the tart, juicy flavors complement the caramel’s depth beautifully.
Creative Ways to Present
Transform your Caramel Cake Recipe into an unforgettable showstopper by serving individual slices on vintage plates or cake stands. For fun, try layering small cubes of cake and caramel into parfait glasses for a playful dessert twist. Or, bake the batter as cupcakes and swirl on the caramel frosting for party-friendly treats!
Make Ahead and Storage
Storing Leftovers
Wrap any leftover cake slices tightly in plastic wrap or store in an airtight container at room temperature for up to two days, or in the refrigerator for up to five days. The flavors deepen as they rest, making each leftover bite just as good—maybe even better—than the first!
Freezing
For longer storage, you can freeze the un-frosted cake layers. Once completely cool, wrap each layer tightly with plastic wrap and foil, then freeze for up to two months. When you’re ready, thaw them overnight in the refrigerator before assembling with fresh caramel for that just-baked taste.
Reheating
To enjoy a warm, gooey slice, microwave individual pieces for about 10–15 seconds. If you’ve frozen the cake, make sure it’s thawed, then gently heat in the microwave. The caramel will get nice and soft, enhancing every bite!
FAQs
Can I use store-bought caramel for the Caramel Cake Recipe?
While homemade caramel will always have a richer, fresher taste and texture, you can use high-quality store-bought caramel in a pinch. Just be sure to let it cool and thicken before using it as a filling or frosting.
What’s the best way to prevent my caramel from burning?
Stay attentive and use medium heat when melting the sugar. Swirl the pan gently (don’t stir too much until it begins to color), and once it turns amber, quickly proceed with adding the butter and cream. Don’t walk away—caramel goes from perfect to burnt in seconds!
Can I make this Caramel Cake Recipe as cupcakes?
Absolutely! Just divide the batter among lined cupcake tins and bake for 18–22 minutes. Top each cupcake with a generous swirl of caramel frosting and a drizzle for adorable, handheld treats.
What should I do if my caramel frosting is too runny?
If your frosting isn’t quite thick enough, give it more time to cool and set, stirring occasionally. If needed, pop it in the fridge for 10–15 minutes, checking frequently for the perfect, spreadable consistency.
Is buttermilk really necessary in the Caramel Cake Recipe?
Yes, buttermilk is key for this recipe—it keeps the cake layers incredibly moist and adds a subtle tang that balances the sweetness of the caramel. If you don’t have buttermilk, you can make a substitute by adding 1 tablespoon of lemon juice or vinegar to a cup of milk and letting it sit for a few minutes.
Final Thoughts
This Caramel Cake Recipe truly feels like a celebration baked into every tender, golden layer. If you’ve never made a from-scratch caramel cake before, now is your moment! A little effort, a lot of love, and you’ll have a dessert that turns any gathering into a memory. Gather your friends or family, slice it up, and enjoy—sharing the joy is half the fun!