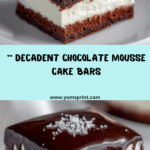
If there’s a dessert I find impossible to resist, it’s the Chocolate Mousse Square Recipe. Imagine three luxurious layers: a super-moist chocolate cake base, dreamy clouds of white mousse, and a glossy sheet of chocolate ganache, all coming together in a delightful square that just melts in your mouth. Perfectly at home at a family birthday party or as a casual after-dinner treat, this recipe delivers both chocolatey comfort and show-stopping style. Whether you’re looking to treat yourself or wow your friends, this is the sweet square you’ll want to share (but you might not want to!).

Ingredients You’ll Need
What makes this Chocolate Mousse Square Recipe truly special is how a handful of pantry staples and a little know-how create something so impressive and satisfying. Each ingredient brings a unique note to the symphony of taste and texture — it’s a classic case of simple ingredients creating magic together!
- All-purpose flour: Delivers structure and softness in the cake base, making it sturdy yet tender enough for layering.
- Granulated sugar: Sweetens the cake and helps keep it incredibly moist.
- Unsweetened cocoa powder: Offers deep, rich chocolate flavor essential to every bite.
- Baking soda: Gives lift and fluffiness to the cake layer.
- Salt: Enhances chocolate flavor and keeps the sweetness balanced.
- Eggs: Bind the batter together while enriching its texture.
- Buttermilk: Contributes tang, tenderness, and a fantastic crumb.
- Vegetable oil: Keeps the cake moist long after baking.
- Vanilla extract: Adds warmth and sweetness to both cake and mousse.
- Hot water or hot coffee: Blooms the cocoa and deepens the chocolate taste—coffee is my secret weapon for extra depth!
- Heavy whipping cream (for mousse and ganache): Whips up to fluffy peaks for a dreamy mousse; creates a rich ganache topping.
- Powdered sugar: Sweetens the mousse while helping to stabilize its airy texture.
- Cream cheese: Adds body and tangy smoothness to the mousse layer.
- Milk: Lightens and loosens the mousse for perfect spreadability.
- Semisweet chocolate: The soul of the ganache — dark, glossy, and absolutely irresistible.
- Shredded coconut or coarse sugar (optional): For garnish and a sparkling finish on top.
How to Make Chocolate Mousse Square Recipe
Step 1: Bake the Moist Chocolate Cake
Start by preheating your oven to 350°F (175°C), and preparing a 9 x 13 inch pan with a bit of grease and flour. This ensures nothing sticks, so you get perfect squares later! Whisk together your dry ingredients — flour, sugar, cocoa, baking soda, and salt — before adding the wet: eggs, buttermilk, oil, and vanilla. The magic happens when you pour in the hot water or coffee, transforming the batter into a smooth, shiny pool of chocolate goodness. Pour it all into the pan and bake until a toothpick comes out clean, about 30–35 minutes. Let it cool completely before moving on.
Step 2: Whip Up the Dreamy White Mousse Layer
For the standout mousse, whip your cold heavy cream with powdered sugar and vanilla until stiff peaks form. This takes just a few minutes but transforms the cream into a fluffy, cloud-like mixture. In another bowl, blend cream cheese and milk until completely smooth — no lumps allowed here! Now comes the most satisfying step: gently folding the whipped cream into the cream cheese mixture. Be gentle so you don’t lose any air; you want a mousse that’s as light as it is luscious.
Step 3: Assemble and Layer the Dessert
Once your cake has cooled, use a long serrated knife to carefully slice it horizontally, creating two even layers. Place the bottom half back into your 9 x 13 inch pan or straight onto a serving platter. Gently spread half of your luscious white mousse over the cake, then top with the second cake layer and finish with the rest of the mousse. This creates the beautiful, distinctive dual-layered look of the Chocolate Mousse Square Recipe. Refrigerate for at least two hours so the mousse firms up and flavors meld.
Step 4: Pour on the Chocolate Ganache
Chop your semisweet chocolate and place it in a heatproof bowl. Warm the cream just until it starts to simmer — don’t let it boil — and pour it over the chocolate. After five minutes, whisk until you have a silky, shiny ganache. Cool it slightly until pourable but not hot, then pour over your chilled mousse layer, spreading to the edges for that gorgeous, glossy finish. Sprinkle with coconut or coarse sugar if you fancy, then chill once more to set. When you finally cut those decadent squares, you’ll see every mouthwatering layer.
How to Serve Chocolate Mousse Square Recipe

Garnishes
For a touch of elegance, sprinkle the top with shredded coconut to contrast the deep chocolate tones, or add a dusting of coarse sugar for genuine sparkle. A few chocolate curls or shavings also work beautifully and never fail to impress guests. If you love fresh berries, a couple of raspberries or strawberries on each square are stunning against the dark ganache.
Side Dishes
While the Chocolate Mousse Square Recipe truly shines on its own, you can enhance the experience with a scoop of vanilla ice cream or a dollop of whipped cream alongside. Fresh fruit, like orange slices or a simple berry compote, adds just the right balance of tartness and color to each plate.
Creative Ways to Present
I love cutting these squares into small, bite-sized cubes for a family party dessert platter. Alternatively, you can serve them in parfait glasses by layering cubes of cake, mousse, and a drizzle of ganache. Mini trifle jars are adorable for picnics or gatherings, letting everyone see the beautiful layers through the glass. Add a little pick or chocolate stick for a playful touch!
Make Ahead and Storage
Storing Leftovers
Chocolate Mousse Square Recipe stores beautifully in the refrigerator. Simply cover the pan tightly with plastic wrap or transfer squares to an airtight container. They’ll stay delicious and fresh for up to four days, so you can sneak a square every time the mood strikes!
Freezing
If you want to save a batch for later (or prep ahead), these squares freeze very well. Cut and layer them with parchment between, then seal in a freezer-safe container. They’ll keep their flavor and texture for up to a month. Defrost overnight in the fridge for the most luscious results — the mousse will be just as creamy as the day you made it.
Reheating
While this dessert is meant to be enjoyed chilled, if you take it right from the fridge, allow it to sit at room temperature for 10 to 15 minutes before serving to soften the mousse slightly and bring out the flavors. Avoid microwaving, as this would melt the mousse and ganache layers.
FAQs
Can I make the Chocolate Mousse Square Recipe gluten-free?
Absolutely! Simply swap the all-purpose flour for your favorite cup-for-cup gluten-free baking blend. Everything else in the recipe remains the same, and no one will guess they’re not eating the original.
Can I prepare the mousse ahead of time?
Yes, you can make the mousse up to a day ahead and keep it chilled. Just give it a quick whisk before spreading to restore the fluffiness if it settles.
What’s the trick to clean slices?
Use a sharp knife dipped in hot water (wipe dry after dipping) for each cut. This will help glide cleanly through the mousse and ganache, giving you beautiful bakery-worthy squares each time.
Can I substitute dark chocolate for the ganache?
Definitely! If you prefer a more pronounced chocolate flavor, feel free to use a good-quality dark chocolate for the ganache topping. Just be aware it’ll have a more intense (and less sweet) flavor profile.
How do I keep the mousse from deflating?
Be gentle when folding the whipped cream into the cream cheese mixture. Don’t overmix — just until incorporated. This technique ensures your mousse layer stays light and cloud-like, the perfect complement to the cake layer in this Chocolate Mousse Square Recipe.
Final Thoughts
I genuinely can’t wait for you to try this Chocolate Mousse Square Recipe. It’s one of those desserts that always gets requests for seconds and recipe cards to take home. Rich, creamy, and just the right amount of fancy, it has everything you could want in a homemade treat. So gather your ingredients and get ready to create something truly special — I promise you’ll be adding these squares to your go-to dessert list in no time!