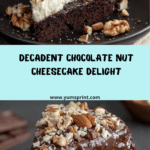
If you’re on the hunt for the ultimate dessert, the Chocolate Nut Cheesecake Recipe is everything your sweet tooth has ever wished for: decadent chocolate, creamy cheesecake filling, a crunchy nutty topping, and a cookie crumb crust that’s pure bliss in every bite. This isn’t just a special occasion treat; it’s a personal celebration in the form of a showstopping cheesecake, with rich flavors and luscious textures that keep everyone coming back for seconds.

Ingredients You’ll Need
The brilliance of this recipe is how such simple, everyday ingredients combine to create a truly memorable Chocolate Nut Cheesecake Recipe. Each one plays a starring role, from creating that dreamy texture to building bold flavors and mouthwatering aromas.
- Chocolate cookie crumbs: These form the crisp, chocolatey base that perfectly contrasts the creamy filling.
- Unsalted butter: Melted butter brings the crumbs together for a sturdy, buttery crust.
- Cream cheese: The heart of any great cheesecake, delivering that signature smooth, tangy richness.
- Granulated sugar: Balances the tang, sweetening the filling just right without making it overly sugary.
- Large eggs: At room temperature, they bind the filling and help everything bake up silky smooth.
- Sour cream: Adds a hint of tang and a light, creamy texture to the cheesecake layer.
- Vanilla extract: Just a teaspoon wakes up every other flavor in the mix.
- Semi-sweet chocolate: Melted and blended in, it gives the filling its irresistible chocolate kick.
- Dark chocolate: Used for the luscious ganache topping, creating a rich chocolate finish.
- Heavy cream: Combines with chocolate for a silky, pourable ganache.
- Mixed nuts (almonds, walnuts, pecans): Roughly chopped and sprinkled on top, nuts add crunch and toasty depth.
How to Make Chocolate Nut Cheesecake Recipe
Step 1: Make the Crust
Preheat your oven to 325°F (160°C). In a mixing bowl, combine the chocolate cookie crumbs with the melted butter. Stir until the mixture is the texture of wet sand. Firmly press this mixture into the bottom of a 9-inch springform pan. This sturdy yet fudgy base is what makes every bite amazing. Bake the crust for 10 minutes, then set aside to cool completely as you prepare the filling.
Step 2: Prepare the Cheesecake Filling
In a large bowl, beat together the softened cream cheese and sugar until perfectly smooth and creamy; don’t rush this step, as it lays the foundation for an ultra-silky texture. Next, beat in the eggs one at a time on low speed, ensuring each egg is fully incorporated before adding the next. Stir in the sour cream and vanilla extract for dreamy richness. Finally, fold in the melted, slightly cooled semi-sweet chocolate until the batter is luxuriously chocolaty. Pour this mixture over your cooled crust.
Step 3: Bake the Cheesecake
Before placing your masterpiece into the oven, wrap the outside of the springform pan with a generous layer of aluminum foil; this keeps water from seeping in. Place your pan in a larger baking dish and pour in about 1 inch of hot water to create a gentle, steamy environment that prevents cracks and keeps the cheesecake marvelously moist. Bake for 60–70 minutes until the center is just set but still has a slight jiggle. Turn off the oven, crack the oven door, and let your Chocolate Nut Cheesecake Recipe cool inside for 1 hour. Finally, refrigerate for at least 4 hours (or overnight) to let all that flavor settle in and the texture become perfect.
Step 4: Make the Chocolate Ganache
Once your chilled cheesecake is ready, place the chopped dark chocolate in a bowl. In a small saucepan, heat the heavy cream just until it begins to steam. Don’t boil! Pour the hot cream over the chocolate, let it sit a couple of minutes, then whisk until the ganache is glossy and smooth. Pour this decadent sauce over your cheesecake and gently spread to the edges.
Step 5: Add Toppings & Serve
Scatter the roughly chopped nuts (and extra chocolate chunks if you love a bit more texture) over the ganache while it’s still soft. This is where your Chocolate Nut Cheesecake Recipe gets an irresistible crunch and a pop of nutty flavor with every bite. Chill for 30 minutes so everything sets perfectly before slicing. For extra flair, run a knife under hot water and wipe it clean for those picture-perfect slices.
How to Serve Chocolate Nut Cheesecake Recipe

Garnishes
Adding the right finishing touches makes every slice feel special. Try a cloud of freshly whipped cream, some elegant chocolate curls, or extra toasted nuts for added crunch. A dusting of cocoa powder or a few berries can also lift the visuals and taste to new heights.
Side Dishes
Because the Chocolate Nut Cheesecake Recipe is so rich, pair it with lighter side dishes like a fresh berry salad, a scoop of tangy sorbet, or a little dish of tart cherries. Coffee or a shot of espresso also makes the perfect drinking partner, offsetting the cake’s richness without overwhelming the palate.
Creative Ways to Present
You can turn individual slices into mini works of art with creative plating. Serve each portion on a swirl of raspberry coulis, drizzle with caramel, or layer with ice cream for a luxurious twist. For gatherings, cut the cheesecake into small squares and arrange on a platter with decorative toothpicks for an irresistible dessert buffet.
Make Ahead and Storage
Storing Leftovers
Simply pop any leftover cheesecake into an airtight container and store it in the refrigerator for up to five days. The flavors often deepen as it sits, so don’t be shy about sneaking a slice the next day for maximum enjoyment.
Freezing
The Chocolate Nut Cheesecake Recipe freezes beautifully! Wrap the cheesecake (whole or sliced) tightly in plastic wrap, then again in foil. Store it in the freezer for up to two months. Thaw overnight in the fridge before serving for best texture and flavor.
Reheating
Cheesecake is best served chilled or at cool room temperature, so there’s no need to reheat. If you want a softer texture or slightly melty ganache, you can let a slice sit at room temperature for 15–20 minutes before serving.
FAQs
Can I use milk chocolate or white chocolate instead of semi-sweet or dark chocolate?
Absolutely. Feel free to swap in your favorite chocolate, but keep in mind that milk or white chocolate will yield a sweeter result. Dark chocolate keeps the balance just right for this Chocolate Nut Cheesecake Recipe.
Why do I need a water bath for baking cheesecake?
The gentle steam from a water bath creates an even, moist environment that prevents cracking and keeps the filling creamy. Don’t skip this step; it makes all the difference in the final texture of your cheesecake.
Can I make the crust with something other than chocolate cookie crumbs?
Yes! Oreo cookies (with or without the cream), chocolate graham crackers, or even a mixture of chocolate and classic graham crackers work well. Just be sure to keep the proportions the same for the best texture.
What’s the best way to cut clean slices?
Dip a sharp knife in hot water and wipe it dry before each cut. This helps the blade glide through both the ganache and soft filling for neat, beautiful slices—no more messy desserts!
How far ahead can I make the Chocolate Nut Cheesecake Recipe?
This dessert is perfect for making in advance! You can prepare it up to two days ahead and keep it chilled until you’re ready to add the ganache and nuts. It’s a lifesaver for busy schedules and always tastes better after a good chill.
Final Thoughts
Go ahead—treat yourself and your loved ones to this unforgettable Chocolate Nut Cheesecake Recipe. Every slice is a little celebration and, honestly, it might just become your new go-to dessert for all things festive, comforting, and wonderfully delicious. Give it a try and experience the magic for yourself!