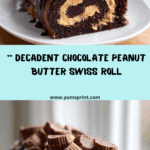
If you’re dreaming of a swoon-worthy dessert that’s soft, creamy, and utterly indulgent, look no further than the Chocolate Peanut Butter Swiss Roll. Imagine tender chocolate sponge cake wrapped around the silkiest peanut butter cream, finished with a glossy ganache and those irresistible peanut butter cup bits on top. Whether it’s a showstopper for a holiday table or a just-because treat with a tall glass of milk, this roll never fails to win hearts.

Ingredients You’ll Need
The beauty of the Chocolate Peanut Butter Swiss Roll lies in its symphony of simple ingredients. Each component—fluffy sponge, rich filling, and luxurious ganache—relies on pantry staples that come together for show-stopping results. Take a peek at what you’ll need, and note the role each ingredient plays in building the ultimate dessert experience.
- Eggs: Whipped until airy, eggs are the secret to that cloud-like sponge texture in your cake.
- All-purpose flour: Provides structure while still allowing for a tender bite.
- Granulated sugar: Sweetens the cake base and helps with volume during whipping.
- Unsweetened cocoa powder: Delivers deep chocolate flavor and a beautiful dark hue.
- Baking powder: Gives the cake its lift and lovely lightness.
- Milk: Adds moisture to keep the sponge from drying out.
- Vegetable oil or melted butter: Ensures the cake is supple and easy to roll (oil makes it extra soft, butter gives extra flavor).
- Vanilla extract: Rounds out sweet and toasty notes in both cake and filling.
- Pinch of salt: Enhances all the other flavors, balancing sweetness and richness.
- Heavy cream (for filling & ganache): Whipped into the filling for airy lightness and heated for a decadent ganache.
- Creamy peanut butter: The star of the filling, its bold nutty presence is unforgettable.
- Powdered sugar: Sweetens the filling while keeping it smooth and creamy.
- Semisweet or milk chocolate: Melts into a glossy ganache that envelops the roll in chocolatey luxury.
- Butter (for ganache): Adds shine and richness, keeping the ganache satiny.
- Mini peanut butter cups: The perfect playful topping for extra peanutty goodness.
- Chocolate drizzle or extra ganache: For a dramatic finish and even more chocolate appeal.
- Crushed peanuts (optional): Sprinkle on top if you want a little salty crunch in every bite!
How to Make Chocolate Peanut Butter Swiss Roll
Step 1: Bake the Chocolate Sponge
To set the foundation for your Chocolate Peanut Butter Swiss Roll, start by preheating your oven to 350°F (175°C). Line a 10×15-inch jelly roll pan with parchment for easy release. In a large bowl, whip the eggs and sugar using a mixer on high speed for 5–6 minutes, until the mixture becomes thick, pale, and nearly triples in volume. This is what ensures your sponge stays airy and rolls without cracking. Sift together the flour, cocoa powder, baking powder, and salt, then gently fold the dry mix into the eggs (a light hand will prevent deflation). Finally, stir in the milk, oil, and vanilla extract just until blended. Pour the batter into your prepared pan, spread it gently, and bake for 10–12 minutes until springy to the touch—do not overbake, or it will lose flexibility.
Step 2: Rolling the Cake
While the sponge is still warm, dust a clean kitchen towel with cocoa powder (this prevents sticking and adds flavor). Turn the cake out onto the towel, peel away the parchment carefully, and, starting from the short side, roll it up tightly with the towel inside the roll. Rolling while warm trains the cake to keep its shape and helps you avoid cracks. Let it cool completely in this rolled-up state.
Step 3: Prepare the Peanut Butter Filling
For fluffy, cloud-like filling, beat cold heavy cream until soft peaks form. In a separate bowl, whisk together the creamy peanut butter, powdered sugar, and vanilla until smooth and luscious. Gently fold the whipped cream into the peanut butter mixture in two additions. The result? An impossibly velvety filling that’s wonderfully peanutty without being dense.
Step 4: Assemble the Roll
Once your cake is cool, unroll it carefully. Spread the peanut butter filling in an even layer, leaving a small border to prevent spillage. If you want to add a thin layer of melted chocolate before the cream, now’s the time—this step amps up the richness! Gently roll the cake back up (without the towel), wrap it tightly in plastic wrap, and chill for at least 30 minutes. Chilling sets the shape and makes slicing a breeze.
Step 5: Make the Chocolate Ganache
While the roll chills, melt down semisweet or milk chocolate with hot heavy cream and a touch of butter. Pour the hot cream over the chopped chocolate and butter in a bowl, then let it sit for a minute before stirring until glossy and smooth. Once the roll is set, pour the ganache evenly on top, letting it drip down the sides for that scrumptious, irresistible look.
Step 6: Decorate
To finish, top your Chocolate Peanut Butter Swiss Roll with mini peanut butter cups, a playful drizzle of extra chocolate, and a dusting of crushed peanuts if you like a little crunch. Let the ganache set before slicing and serving—the anticipation just makes it all the more rewarding!
How to Serve Chocolate Peanut Butter Swiss Roll

Garnishes
The real fun comes with the finishing touches! A handful of mini peanut butter cups chopped or left whole makes every slice pop with color and flavor. Drizzle extra ganache in a zigzag or go for a lacy design if you’re feeling fancy. For a textured flourish, a sprinkle of crushed peanuts brings out the nuttiness even more—plus, it looks beautiful on a plate.
Side Dishes
This Chocolate Peanut Butter Swiss Roll is incredibly rich on its own, but you can make the experience even more memorable. Serve slices with a scoop of vanilla ice cream, a pile of fresh berries, or a cloud of lightly sweetened whipped cream. A glass of cold milk or hot coffee pairs perfectly with the bold flavors and balances the sweetness.
Creative Ways to Present
The wow factor of this dessert just begs for a little presentation magic. Try serving the roll on a wooden board surrounded by berries, or slice it thick and plate with a swoosh of ganache and a dusting of cocoa powder. To make it even more dramatic for holidays, you could stack slices slightly overlapping and dot each piece with an extra mini cup and swirl of whipped cream. However you serve it, the Chocolate Peanut Butter Swiss Roll is a feast for both eyes and taste buds!
Make Ahead and Storage
Storing Leftovers
Store any leftover Chocolate Peanut Butter Swiss Roll tightly wrapped in the refrigerator. The filling and ganache both benefit from staying cool, keeping everything firm but still deliciously creamy. Slices will stay fresh and moist for up to three days—if they last that long!
Freezing
If you want to keep the roll for longer, you can absolutely freeze it. After the ganache has set, wrap the whole roll or individual slices in plastic wrap and then in foil to prevent freezer burn. Thaw overnight in the refrigerator before serving. The sponge and filling hold up wonderfully, making it a go-to make-ahead dessert for parties and celebrations.
Reheating
This Chocolate Peanut Butter Swiss Roll is meant to be enjoyed chilled or at cool room temperature, so there’s no need to reheat. Simply let it sit out for 10–15 minutes before serving to let the flavors bloom and textures soften just enough—heavenly!
FAQs
How do I prevent the cake from cracking when rolling?
Roll the cake while it’s still warm and flexible, using a cocoa-dusted towel as support. This prepares the sponge to hold its shape and keeps it smooth and crack-free after it cools.
Can I use natural peanut butter in the filling?
While you technically can, creamy commercial peanut butter is best for a smooth, stable filling. Natural peanut butter tends to separate, which can make the cream a bit runny. If using natural, be sure to stir it thoroughly before incorporating and expect a slightly different texture.
What kind of chocolate works best for the ganache?
Both semisweet and milk chocolate work well, depending on your sweetness preference. Semisweet produces a deeper, more intense chocolate flavor, while milk chocolate keeps things sweeter and milder for the Chocolate Peanut Butter Swiss Roll.
Can I make the roll in advance?
Absolutely! The roll can be assembled, filled, and covered with ganache up to a day ahead. In fact, letting it chill overnight actually improves the flavors and makes slicing easier.
Do I need any special equipment to make this recipe?
A standard electric mixer (handheld or stand), a 10×15-inch jelly roll pan, and a clean kitchen towel are all you need. No need for fancy equipment—just a little patience and a lot of chocolate enthusiasm!
Final Thoughts
If you’ve ever wanted a dessert that looks as good as it tastes, you simply have to make a Chocolate Peanut Butter Swiss Roll! Each slice is a swirl of chocolate, peanut butter, and pure happiness. Give it a try, share it with friends, and watch this roll become the star at your next gathering. I promise—it’s the kind of treat you’ll come back to again and again!