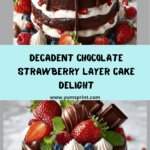
Imagine the ultimate blend of moist chocolate sponge, billowy clouds of whipped cream, and bursts of juicy, fresh strawberries all crowned by a glossy chocolate ganache. That’s exactly what you get in this Chocolate Strawberry Layer Cake—a show-stopping dessert that manages to look gorgeous and taste even better. Every bite is a delightful mix of indulgent chocolate and bright, fruity freshness, making it perfect for celebrations, birthdays, or simply treating yourself to something extraordinary!

Ingredients You’ll Need
The beauty of this cake is how every simple ingredient brings its own magic—contributing to that rich chocolate flavor, velvety creaminess, and ruby-red bursts of berry freshness. Here’s everything you’ll need, along with tips for making every part of your Chocolate Strawberry Layer Cake shine.
- All-purpose flour: Forms the backbone of the cake, keeping things soft but sturdy enough for layers.
- Cocoa powder: Choose a high-quality unsweetened cocoa for deep, authentic chocolate flavor.
- Sugar: Sweetens the sponge and balances the cocoa’s natural bitterness.
- Baking powder: Helps the cake rise tall and fluffy.
- Baking soda: Adds just the right lift and ensures a tender crumb.
- Salt: Enhances all the other flavors; don’t skip it!
- Eggs: Bind the ingredients together, adding richness and structure.
- Vegetable oil: Makes the sponge unbelievably moist—much more so than butter.
- Milk: Adds moisture and keeps the crumb soft.
- Hot coffee: Intensifies the chocolate flavor without overpowering it—trust me, you won’t taste the coffee!
- Vanilla extract: A lovely aromatic note that complements both the chocolate and cream.
- Heavy cream (cold): Whips up into a dreamy filling; make sure it’s straight from the fridge.
- Powdered sugar: Sweetens the whipped cream just enough.
- Dark chocolate (chopped): For the decadently smooth ganache drizzle.
- Fresh strawberries: Both inside and on top; these are the stars for color, flavor, and decoration.
- Blueberries & raspberries (optional): Bring extra color and tartness if you want to mix it up.
- Chocolate bars or truffles: Optional, but they make the cake extra dazzling for special occasions.
- Fresh mint leaves: Add a finishing touch of color and a refreshing aroma.
How to Make Chocolate Strawberry Layer Cake
Step 1: Bake the Chocolate Sponge Cakes
Start by preheating your oven to 175°C (350°F) and prepping three 15 cm (6-inch) round pans with grease and parchment—this makes removing the cakes a breeze. Combine your dry ingredients in a bowl, then whisk in the eggs, oil, milk, and vanilla for a smooth batter. The hot coffee goes in last to deepen the flavor (don’t worry, it won’t taste like coffee!). Divide the luscious batter between the pans and bake for 20 to 25 minutes, until a toothpick comes out clean. Be sure to cool them completely—you want neat, beautiful layers later on!
Step 2: Whip the Cream Filling
Pour the cold heavy cream, powdered sugar, and vanilla into a large bowl (a chilled metal bowl works best). Whip everything until you get thick, stiff peaks—the kind that hold their shape when lifted. This ultra-light cream adds a dreamy contrast to the rich chocolate, so resist eating it all straight from the bowl! Keep it chilled while you move on.
Step 3: Make the Ganache
Now melt together the finishing touch: heat your heavy cream until just steaming, then pour it over the chopped dark chocolate. Give it a minute to melt together, then stir until luxuriously smooth and glossy. Let it cool a bit so it thickens enough to drip perfectly down the cake without running everywhere.
Step 4: Assemble the Layers
Here’s where all the parts come together! Lay the first chocolate sponge on your cake stand and spread a generous layer of whipped cream on top. Gently press a few sliced strawberries into the cream for an extra fruity surprise. Repeat with the second layer. Place the final sponge on top, and lavish more cream over the crown of the cake.
Step 5: Decorate with Ganache and Berries
Pour the cooled ganache over the top, letting it drip down in those iconic, drool-worthy ganache streaks. Crown the cake with whole and halved strawberries, a scattering of blueberries and raspberries if you like, and a few chocolate bars or truffles. A few fresh mint leaves tucked in amongst the berries make it utterly irresistible.
Step 6: Chill and Slice
Before you dig in, pop your finished Chocolate Strawberry Layer Cake into the fridge for at least an hour. This helps the cream and ganache set up for gorgeous, clean slices—plus, the flavors only get better as they meld together. Now, gather friends or family and enjoy your masterpiece!
How to Serve Chocolate Strawberry Layer Cake

Garnishes
A show-stopper like this deserves beautiful finishing touches! Pile on an abundance of fresh strawberries, tuck in delicate mint leaves, and nestle a few glossy chocolate truffles or bars along the top. If you’re feeling fancy, a sprinkle of edible gold dust adds a little extra celebration sparkle.
Side Dishes
This cake is indulgent all on its own, but if you’d love a little something alongside, try serving slices with scoops of vanilla bean ice cream or a light berry salad. A fresh, gently sweetened whipped cream dollop can also complement the rich layers without overwhelming the palate.
Creative Ways to Present
Transform individual cake slices into plated desserts by drizzling extra ganache on the plate, garnishing with a berry medley, or even a sprig of mint. For parties, you can cut the Chocolate Strawberry Layer Cake into mini squares for a stunning dessert tray—each with their own chocolate drizzle and berry on top!
Make Ahead and Storage
Storing Leftovers
Got leftovers? Lucky you! Simply cover any uneaten cake well with cling film or store in an airtight container in the fridge. The cake keeps beautifully for up to three days—though the fresh berries are at their best within the first 48 hours.
Freezing
Want to freeze a few slices for later? No problem! Wrap individual slices tightly in plastic wrap and pop them in a freezer-safe bag. They’ll taste wonderfully fresh for up to one month. Just be aware that the texture of the whipped cream may be a bit softer after thawing, but all the flavors remain delicious.
Reheating
Cakes like this don’t need reheating—simply let chilled slices sit at room temperature for 15 minutes before serving to let the chocolate and cream turn meltingly luscious. No oven or microwave required!
FAQs
Can I use other berries or fruits in this cake?
Absolutely! While strawberries are classic and beloved in this Chocolate Strawberry Layer Cake, you can mix in raspberries, blueberries, or even sliced peaches for colorful variety—the cake is wonderfully versatile.
What if I don’t have three cake pans?
No worries! You can bake the sponge in batches, or use a larger pan and carefully slice the cake into layers once cooled. Just be sure to trim the top for even, flat layers.
Can I make this cake a day ahead?
Yes, and it actually tastes even better after sitting overnight! Prepare the Chocolate Strawberry Layer Cake, keep it well covered in the fridge, and the layers will settle together beautifully for elegant slicing the next day.
What’s the best way to get clean, beautiful slices?
For neat slices, use a sharp knife dipped in hot water and wiped dry for each cut. This helps glide through the ganache and cream layers for picture-perfect servings!
Can I make the cake gluten-free?
Definitely! Just swap the all-purpose flour for your favorite gluten-free baking blend (make sure it includes xanthan gum or a binding agent). Your Chocolate Strawberry Layer Cake will be just as delightful and safe for gluten-sensitive friends.
Final Thoughts
There’s nothing quite like the joy of sharing a homemade Chocolate Strawberry Layer Cake with people you love—the smiles, the “wow”s, and the inevitable requests for seconds! I hope you give this recipe a try and enjoy every luscious, berry-bright bite.