

There’s just something magical about buttery, delicate cookies that melt in your mouth — and these Easy Piped Butter Cookies truly deliver that magic with every single bite. With only a handful of pantry staples and very little fuss, you can whip up a batch of bakery-quality treats that look absolutely stunning but take almost no time to prepare. Whether you’re new to piping cookies or a seasoned baker, this recipe guarantees the kind of crisp-edged, tender treats that always steal the show at any gathering.

Ingredients You’ll Need
The beauty of Easy Piped Butter Cookies lies in their simplicity: each ingredient serves an essential purpose, making the final cookies gorgeously tender, light, and flavorful. Let’s look at the starring cast behind these irresistible little swirls.
- Unsalted butter: Use high-quality butter since it’s the backbone of flavor and texture — make sure it’s perfectly softened for easy creaming!
- Powdered sugar: This gives the cookies a lovely melt-in-your-mouth texture and just the right touch of sweetness.
- All-purpose flour: The structure-builder! Sift it for smoother dough and prettier piped details.
- Cornstarch: The secret to that famously delicate, tender crumb; it lightens the flour mixture beautifully.
- Vanilla extract: Don’t skip it — true vanilla lifts and perfumes each bite for classic old-fashioned flavor.
- Milk: Add as needed to perfect the dough’s consistency, making it pipeable without becoming runny.
How to Make Easy Piped Butter Cookies
Step 1: Cream the Butter and Sugar
Start by beating your softened butter with the powdered sugar until the mixture turns pale and impossibly fluffy. This step is key for that luscious, airy texture — take your time and don’t rush. The more you whip, the more tender your Easy Piped Butter Cookies will be!
Step 2: Add Vanilla and Combine Dry Ingredients
Mix in your vanilla extract, letting its sweet aroma work into the buttery mixture. In a separate bowl, sift together the all-purpose flour and cornstarch, then slowly fold them into the wet ingredients. Sifting ensures your cookies come out picture-perfect, with no lumps to disrupt their shape.
Step 3: Adjust Dough Consistency
If your dough feels a bit stiff and doesn’t want to flow through the piping bag, don’t worry — just dribble in a tablespoon of milk at a time, mixing gently after each addition. You’re aiming for a soft, pipeable consistency that holds shape without being too firm or sticky.
Step 4: Pipe the Cookies
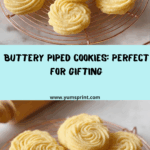
Scoop your dough into a piping bag fitted with a large open star tip. Pipe elegant swirls, rosettes, or shapes of your choice onto a baking tray lined with parchment paper. These delightful shapes are half the fun of Easy Piped Butter Cookies — get creative!
Step 5: Chill, Bake, and Cool
Pop the tray into the fridge and let your cookies chill for about 15 minutes. This crucial step helps them keep their lovely ridges when baking. Bake in a preheated oven at 170°C (340°F) for 12–15 minutes, just until the edges start turning golden. Let them sit on the tray for five minutes before carefully moving them to a rack to cool completely.
How to Serve Easy Piped Butter Cookies

Garnishes
These cookies are classic beauties, but a finishing touch never hurts. Consider a dusting of powdered sugar, a drizzle of melted chocolate, or a few colorful sprinkles before or after baking. For something special, dip the edges in white or dark chocolate and scatter chopped nuts or dried fruit on top.
Side Dishes
Easy Piped Butter Cookies make a dreamy pairing with tea or coffee for an afternoon pick-me-up. Serve alongside a bowl of fresh berries, or with a scoop of vanilla ice cream for dessert. They’re also right at home on any festive cookie tray — think holiday spreads or birthday parties!
Creative Ways to Present
Package these cookies in clear cellophane bags tied with a ribbon for a heartfelt edible gift, or stack them in a decorative tin lined with parchment paper for an elegant presentation. Create a cookie “tasting board” by pairing your Easy Piped Butter Cookies with other homemade treats and seasonal candies.
Make Ahead and Storage
Storing Leftovers
Once your cookies are completely cool, store them in an airtight container at room temperature. They’ll stay fresh for up to a week without losing their delightful texture — though they rarely last that long in my house!
Freezing
Need to bake ahead? You’re in luck. Easy Piped Butter Cookies freeze wonderfully. Arrange them in single layers with parchment between, seal tightly, and freeze for up to two months. Thaw at room temperature when you’re ready to serve and they’ll taste as lovely as freshly baked.
Reheating
If you prefer your cookies just slightly warm, pop them in a 300°F (150°C) oven for about 3–4 minutes straight from the freezer, or simply let them come to room temperature on the counter. Avoid microwaving to preserve their trademark crispness.
FAQs
Can I color the dough for Easy Piped Butter Cookies?
Absolutely! A drop or two of gel food coloring in the dough will yield beautiful pastel or bold cookies. Just remember to mix in the color thoroughly before piping for the prettiest results.
Why do my piped butter cookies sometimes spread too much?
This usually means your dough was too warm or too soft before baking. Be sure to chill the piped cookies on the tray for at least 15 minutes so they keep their shape while baking.
Can I use salted butter instead of unsalted?
You can, but be aware it will add more saltiness to the finished cookies. Reduce or eliminate any added salt if you swap in salted butter to keep the flavor balanced.
What piping tip works best for Easy Piped Butter Cookies?
A large open star tip is traditional and creates beautiful ridges, but any sturdy tip will do — experiment to find your favorite patterns or shapes!
Can I make the dough ahead and refrigerate overnight?
Yes, you can cover the dough tightly and refrigerate it for up to 24 hours. Let it sit at room temperature for a bit before piping to soften up for easier handling.
Final Thoughts
If you love sharing little moments of joy from your oven, it’s time to bake a batch of these Easy Piped Butter Cookies. They’re effortless yet elegant, endlessly customizable, and guaranteed to bring big smiles — so get your piping bag ready and treat yourself to a taste of homemade happiness!
Unlock top-tier commissions—become our affiliate partner now! https://shorturl.fm/pMnoo
Share your unique link and earn up to 40% commission! https://shorturl.fm/uujtV
Join our affiliate program and start earning commissions today—sign up now! https://shorturl.fm/n7DM7
Drive sales, earn big—enroll in our affiliate program! https://shorturl.fm/HPugc
Sign up and turn your connections into cash—join our affiliate program! https://shorturl.fm/QU0bV