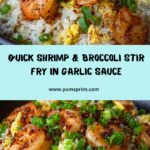
If you’re searching for a soul-satisfying dinner that’s low on carbs but high on flavor, Garlic Shrimp Shirataki Fried Rice is about to be your new weeknight obsession. Imagine juicy shrimp mingling with aromatic garlic, tender yet bouncy shirataki rice, crisp veggies, and a savory splash of soy — this dish packs all the depth and comfort of classic fried rice, minus the heavy carbs. The transformation of humble shirataki rice into a truly satisfying stir-fry is nothing short of kitchen magic, and the garlicky shrimp make it unbeatable. Whether you’re keeping things keto, cooking for a friend, or simply craving something bold and fuss-free, Garlic Shrimp Shirataki Fried Rice will become part of your regular rotation.

Ingredients You’ll Need
It’s always amazing how a handful of pantry staples and fresh ingredients can create something so special. Every single item in this recipe plays a crucial role — from the nuttiness of sesame oil to pops of green onion — building layers of flavor and color in Garlic Shrimp Shirataki Fried Rice.
- Shirataki rice: A low-carb, pleasantly chewy rice substitute that soaks up all the saucy flavors and keeps this dish wonderfully light.
- Shrimp: Pick raw, peeled, and deveined shrimp for the juiciest, plumpest bites in your fried rice.
- Avocado or olive oil: These oils help sear the shrimp and fry your rice without overpowering flavors; pick whichever you prefer.
- Sesame oil: Just a drizzle brings an irresistible toasty richness that’s essential for authentic fried rice aroma.
- Garlic: Fresh minced garlic infuses the entire dish with a fragrant, savory backbone.
- Eggs: Scrambled right into the pan for classic texture and a hint of richness in every spoonful.
- Frozen peas & carrots (or mixed veggies): These add color, sweetness, and a gentle bite; use any veggie combo you love.
- Green onions: Sliced and tossed in at the end for freshness and a bit of crunch.
- Salt & black pepper: Simple seasoning that sharpens all the other flavors.
- Soy sauce or coconut aminos: The main seasoning sauce for that unmistakable fried rice savoriness — coconut aminos are a great soy-free option.
- Oyster sauce (optional): Adds a touch of depth and umami, but can be omitted if keeping things gluten-free.
- White pepper: For gentle heat and extra aroma; use black pepper if that’s what you have.
- Chili oil or chili flakes (optional): Adds a gentle spicy kick if you like your fried rice extra bold.
How to Make Garlic Shrimp Shirataki Fried Rice
Step 1: Dry the Shirataki Rice
Start by rinsing your shirataki rice thoroughly, then take the extra step of dry-sautéing it in a nonstick pan for 3 to 5 minutes. You’ll hear a gentle sizzle as the moisture cooks away — this crucial move gives you the fluffy texture every good fried rice needs (and keeps it from turning soggy later).
Step 2: Cook the Shrimp
Add your avocado or olive oil to a large skillet or wok over medium-high heat. Season the shrimp lightly with salt and black pepper, then sear them for about 1 to 2 minutes per side until they’re just pink and tender. Set those beauties aside so they don’t overcook — they’ll finish with the rice at the very end.
Step 3: Build Flavor with Garlic and Sesame Oil
Lower the heat slightly and pour in the sesame oil. Add the garlic to the pan and sauté for about 30 seconds until it’s golden and fragrant. This step infuses the oil, so every bite of Garlic Shrimp Shirataki Fried Rice carries a gorgeous garlic aroma.
Step 4: Scramble the Eggs
Push the sizzling garlic to one side then pour your beaten eggs into the empty space. Let them gently set before scrambling, just until softly cooked. This creates those classic little ribbons of egg we all love tucking into fried rice.
Step 5: Stir-Fry the Rice and Veggies
Add your thoroughly dry shirataki rice and the frozen veggies straight into the pan. Stir-fry everything together for 3 to 4 minutes, letting the rice heat up and the veggies brighten. The rice will absorb flavors, and the veggies will defrost just right.
Step 6: Season
Pour in the soy sauce or coconut aminos, oyster sauce (if using), white pepper, and a little chili oil or flakes if you like things with heat. Toss well so the savory sauce coats every grain of rice and veggie morsel in your Garlic Shrimp Shirataki Fried Rice.
Step 7: Finish with Shrimp and Green Onions
Finally, return the cooked shrimp and scatter in the sliced green onions. Stir just until everything is heated through and the shrimp are perfectly tender. Serve your Garlic Shrimp Shirataki Fried Rice straight from the pan — piping hot and ready to devour!
How to Serve Garlic Shrimp Shirataki Fried Rice

Garnishes
Ready to finish your masterpiece? Sprinkle with extra green onion, sesame seeds, or even a few drops of chili oil right before serving. These final touches add color and crunch, making each bowl of Garlic Shrimp Shirataki Fried Rice visually inviting and extra flavorful.
Side Dishes
Keep things fresh and simple with a crisp Asian cucumber salad, or add a bowl of miso soup on the side for a comforting combo. For something heartier, try a quick kimchi or some sautéed bok choy. These pairings complement the garlicky shrimp and fried rice with bright, lively notes.
Creative Ways to Present
If you want a showstopper, pile the Garlic Shrimp Shirataki Fried Rice into hollowed-out bell peppers, serve in lettuce cups for a hand-held dinner, or shape it into a neat mound on each plate with a ring mold. Tiny touches like edible flowers or a dusting of togarashi spice make this dish dinner party-worthy in seconds.
Make Ahead and Storage
Storing Leftovers
Store any leftover Garlic Shrimp Shirataki Fried Rice in a sealed container in the fridge. Thanks to the sturdy shirataki rice and quick-cooked shrimp, it keeps its texture surprisingly well for up to two days, making it great for meal prep or a next-day lunch treat.
Freezing
You can freeze Garlic Shrimp Shirataki Fried Rice for up to one month. Place portions in airtight freezer bags, pressing out as much air as possible. The shirataki rice holds up better than you might expect, and the shrimp retain their tenderness after a gentle reheat.
Reheating
To reheat, either warm your fried rice in a skillet over medium heat (add a splash of water or broth to refresh it) or microwave it loosely covered until hot. If reheating from frozen, thaw in the fridge overnight before heating for best flavor and texture.
FAQs
Can I use cauliflower rice instead of shirataki rice?
Absolutely! If you’d rather use cauliflower rice, just sauté it briefly so it stays fluffy, then follow the same method as with the shirataki. The flavor and garlicky shrimp will still shine.
What’s the best way to clean and dry shirataki rice?
Pour the shirataki rice into a mesh sieve, rinse thoroughly under cold water for a few minutes, then dry-sauté in a hot pan. This step helps eliminate the natural aroma and kicks up that “rice” texture everyone craves in Garlic Shrimp Shirataki Fried Rice.
Can I make this dish completely gluten-free?
Yes, just be sure to choose tamari or coconut aminos instead of regular soy sauce, and skip the oyster sauce or pick a gluten-free version. Double-check your other ingredients to be extra safe!
What proteins can I swap for shrimp?
Feel free to swap in diced chicken breast, tofu, or even leftover roast pork. Each brings its own personality, but be sure to toss it in at the end to avoid overcooking, just as you would the shrimp.
My fried rice is too wet. What went wrong?
The key to perfect Garlic Shrimp Shirataki Fried Rice is drying the shirataki well before cooking. Extra moisture can make the final dish less fluffy. Sauté the rice in a dry pan until it starts to squeak — this gives you the best texture!
Final Thoughts
If you’re craving a plateful of fried rice magic with zero carb guilt and maximum comfort-food vibes, Garlic Shrimp Shirataki Fried Rice will win your heart. Play around with the veggies and spices, and most importantly, make it your own. Give it a try — your kitchen (and your taste buds) are in for a treat!