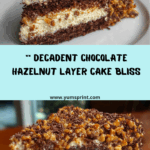
If you’re looking to impress loved ones or celebrate a special occasion in the most decadent way possible, this Heavenly Chocolate Hazelnut Layer Cake is just the showstopper you need. Picture a luscious, cloud-soft chocolate sponge cake layered between creamy hazelnut-infused frosting, draped in silky chocolate, and finished with a sprinkle of toasted hazelnuts—a true masterpiece for any chocolate lover. This cake has become one of my go-to recipes when I want to combine classic flavors with a touch of elegance and a whole lot of wow. Trust me, once you take that first forkful, you’ll know exactly why everyone asks for seconds (or thirds).

Ingredients You’ll Need
Despite the impressive look of this Heavenly Chocolate Hazelnut Layer Cake, the ingredient list is remarkably straightforward. Each element, from the rich cocoa to those crunchy hazelnuts, plays an essential role in building layers of flavor and texture you won’t soon forget.
- All-purpose flour: Provides a sturdy but tender structure for the cake layers to hold all that delicious filling and topping.
- Cocoa powder: Gives the cake its deep, luxurious chocolate flavor—don’t skimp on quality here for best results!
- Sugar: Sweetens the cake while also helping keep it soft and moist.
- Butter: Adds richness and a melt-in-your-mouth feel to every bite.
- Eggs: Bind everything together and add a gentle lift to the batter.
- Milk: Ensures the cake stays supple and moist, never dry or crumbly.
- Baking powder: Gives the cake its beautiful, airy layers—don’t forget this rising star!
- Vanilla extract: Draws out and balances the glorious chocolate notes with warm, aromatic undertones.
- Heavy cream: Whips into cloud-like smoothness for that irresistible frosting texture.
- Chocolate: Melted and drizzled, it forms the ultimate glossy curtain for your cake.
- Hazelnuts: Toasted and chopped, these nuts bring the signature flavor and a lovely crunch.
- Cream cheese: Blended into the frosting, cream cheese lends a slight tang and creamy luxury between the layers.
How to Make Heavenly Chocolate Hazelnut Layer Cake
Step 1: Prep Your Pans and Oven
Start by cranking your oven up to 350°F and greasing your cake pans well. This simple step is key to perfect, easy-to-remove layers with crisp sides—no cake left behind in the pan!
Step 2: Mix the Dry Ingredients
In a large bowl, combine the all-purpose flour, cocoa powder, sugar, and baking powder. Using a whisk ensures everything is evenly distributed; you want that cocoa and rising power in every slice of Heavenly Chocolate Hazelnut Layer Cake.
Step 3: Cream Butter and Sugar, Then Add Eggs and Vanilla
In another bowl, beat the butter and sugar together until positively fluffy and pale, then mix in the eggs one at a time, followed by a generous splash of vanilla. This makes the cake’s crumb tender and aromatic, setting the stage for all the chocolate magic to come.
Step 4: Alternate Dry Ingredients and Milk
Working in two or three rounds, add parts of your dry mixture to the wet ingredients, alternating with the milk. This method keeps the batter smooth and silky, and helps develop that dreamy texture Heavenly Chocolate Hazelnut Layer Cake is known for.
Step 5: Bake the Cake Layers
Evenly divide your batter between the prepared pans and bake for 25–30 minutes, or until a toothpick comes out with just a few moist crumbs. Let the cakes cool in the pans for a few minutes, then turn them out onto a rack to finish cooling completely. Patience here pays off, as warm cakes will melt your frosting!
Step 6: Whip Cream Cheese with Cream and Spread Between Layers
For the dreamy filling, whip together cream cheese and heavy cream until smooth and fluffy. Generously spread this mixture between your cooled cake layers—it’ll keep each layer moist, rich, and full of tangy, creamy delight.
Step 7: Melt Chocolate and Drizzle Over Cake
Gently melt your chocolate (either in a microwave or double boiler), and then drizzle it in artistic ribbons over the cake. The warmth will coax out the glaze’s glossy perfection, making your Heavenly Chocolate Hazelnut Layer Cake gleam and glisten.
Step 8: Chop Hazelnuts and Press Onto Sides
Roughly chop those delightful hazelnuts and press them into the sides of the cake while the frosting is still a bit tacky. The nutty crunch and aromatic finish will instantly turn your cake into a celebration centerpiece.
Step 9: Chill Before Serving
Give your masterpiece some time in the fridge (an hour or two is best) so that the layers can set and the flavors meld. Trust me, this short wait makes the biggest difference, giving the Heavenly Chocolate Hazelnut Layer Cake that impeccably clean slice and luxurious texture.
How to Serve Heavenly Chocolate Hazelnut Layer Cake

Garnishes
For a slice of pure elegance, finish your cake with extra chopped hazelnuts, chocolate curls, or even a dusting of cocoa powder. Edible gold leaf or dollops of whipped cream can make each plate look straight out of a patisserie window.
Side Dishes
A classic vanilla bean ice cream is always a hit when paired with a wedge of Heavenly Chocolate Hazelnut Layer Cake, creating a beautiful temperature and flavor contrast. For something lighter, try fresh berries, which offer a tart pop that balances the cake’s richness wonderfully.
Creative Ways to Present
Cut the cake into small, elegant squares and serve on individual dessert plates for a sophisticated party treat. For birthdays or holidays, a cake stand with a scattering of whole hazelnuts and drizzled chocolate on the sides draws every eye in the room.
Make Ahead and Storage
Storing Leftovers
Wrap your leftover cake slices tightly in plastic wrap or store them in an airtight container in the fridge. The cream cheese and whipped cream frosting holds up perfectly for up to four days, keeping each bite just as luscious as the first.
Freezing
If you’d like to freeze your Heavenly Chocolate Hazelnut Layer Cake, slice it into portions, wrap each piece well, and place in a freezer-safe container. Let slices thaw in the refrigerator overnight when ready to enjoy, and they’ll taste wonderfully fresh.
Reheating
This cake is at its best served chilled or at cool room temperature, so there’s no need to reheat. However, if you love a touch of melty chocolate, a 10-second blast in the microwave will give just enough warmth to the topping without melting the frosting.
FAQs
Can I substitute the hazelnuts with another nut?
Absolutely! While hazelnuts are the signature touch for this cake, toasted almonds or pecans make excellent substitutes if you’re looking to change things up or work with what you have on hand.
Can this cake be made gluten-free?
Yes, swap the all-purpose flour for your favorite 1:1 gluten-free baking blend. Just make sure your cocoa powder and baking powder are also certified gluten-free for a worry-free treat.
How far in advance can I assemble the cake?
You can assemble the Heavenly Chocolate Hazelnut Layer Cake up to two days before serving. Just keep it covered in the refrigerator, and wait to add any delicate garnishes until right before you present it.
Is it possible to make this cake without a mixer?
Yes, it’s absolutely possible! With a sturdy whisk, a wooden spoon, and some old-fashioned elbow grease, you can easily mix everything by hand—the texture might even be a bit more rustic, which has its own charm.
What can I do if my melted chocolate seizes or becomes grainy?
If your chocolate thickens or looks grainy, try stirring in a teaspoon of neutral oil or a splash of warm cream. This will usually restore a smooth, glossy finish for that perfect drizzle over your cake.
Final Thoughts
If you’re ready to indulge in something unforgettable, give this Heavenly Chocolate Hazelnut Layer Cake a try. It’s my favorite combination of rich, moist chocolate and the kind of nutty, creamy filling that brings everyone to the table for just one more bite. Treat yourself to a bake that’s as joyful to create as it is to share.