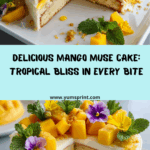
If you could capture a perfect summer afternoon on a plate, it would look—and taste—just like the Mango Muse Cake. This stunning dessert wows with classic, buttery cake layers, vibrant mango purée, and cloud-like cream cheese frosting. Every bite offers a sunny hit of real mango, wrapped in lush, soft cake. Whether you’re celebrating something special or just want to treat your friends and family, the Mango Muse Cake is sunshine and joy in every forkful—guaranteed to lift spirits and spark conversation!

Ingredients You’ll Need
Let’s keep things super approachable: every ingredient here has a real part to play in your Mango Muse Cake’s flavor, tenderness, and visual appeal. Don’t be tempted to skip what might look basic—each one works its quiet magic in texture, taste, or that golden color!
- Softened Butter: This is the foundation of a moist, rich crumb and that unbeatable home-baked aroma.
- Sugar: Adds the perfect sweetness and caramelized undertones once baked.
- Eggs: Essential for stability and structure—plus they add richness and a bit of loft.
- Flour: Provides just the right strength for soft slices that hold together well.
- Baking Powder: The secret to a light, fluffy cake rather than one that’s dense.
- Salt: Don’t skip this—even a pinch draws out the sweetness!
- Milk: For a velvety, tender crumb that stays soft even after chilling.
- Vanilla: Rounds out all the flavors for that classic, bakery-style aroma.
- Ripe Mango Purée: Where the magic happens—choose fragrant, deeply colored mangos for the brightest taste.
- Sugar (for Mango Layer): This just amplifies the mango’s natural sweetness when cooked down.
- Cream Cheese: Lends tang, creaminess, and a faintly tart note to balance the sweetness.
- Butter (for Frosting): Makes the frosting extra fluffy and easy to spread.
- Powdered Sugar: Whips into the frosting without any grittiness for a melt-in-your-mouth finish.
- Milk (for Frosting): Adjusts the consistency so you can get the perfect swoop.
- Vanilla (for Frosting): A little more vanilla makes the frosting warmly fragrant.
- Fresh Mango Slices or Mint (Optional): The easiest (and prettiest) way to finish your Mango Muse Cake—just a few on top and you’re ready for the spotlight.
How to Make Mango Muse Cake
Step 1: Prepare Your Pans and Preheat
Begin by heating your oven to 350°F (175°C)—this ensures that everything bakes evenly right from the start. Lightly grease and flour two cake pans or line them with parchment for stress-free unmolding later. Taking care here means your Mango Muse Cake will look just as beautiful as it tastes.
Step 2: Whip Up the Cake Batter
Cream together your softened butter and sugar until the mixture is extra fluffy and pale—this incorporation of air makes for a lighter finished cake. Next, add the eggs one at a time, beating well after each addition. This ensures your batter emulsifies smoothly and bakes up dreamily tender without any streaks.
Step 3: Mix In Dry and Wet Ingredients
Gently alternate adding your flour, baking powder, and salt mixture with the milk, working in small batches and stirring just until combined. This gentle approach keeps the cake delicate and soft. Finally, stir in the vanilla for that irresistible aroma you’ll catch even before your first bite.
Step 4: Bake and Cool
Divide your batter between the prepared pans and smooth out the tops. Bake for 22 to 26 minutes, or until a toothpick inserted in the center comes out clean. Let the cakes cool completely—this prevents your dreamy frosting from melting and sliding off later!
Step 5: Make the Mango Layer
While your cake layers are baking, it’s time to make that show-stopping mango filling. Simmer your mango purée with a bit of sugar for 3 to 5 minutes, just until thickened and jammy. Let it chill before spreading—warm filling would make the cake layers too soft.
Step 6: Whip up the Cream Cheese Frosting
Beat together the room-temperature cream cheese and butter until totally smooth and creamy. Gradually add powdered sugar, along with the vanilla. If needed, add 1 to 2 tablespoons of milk to get a frosting that’s easily spreadable but holds its shape for swoops and swirls.
Step 7: Assemble the Mango Muse Cake
Time for the magic! Gently stack the cake layers with a generous slather of mango filling and a cushion of frosting between each. Finish by frosting the entire cake, and if you’re feeling fancy, layer on fresh mango slices arranged in a gorgeous fan pattern.
How to Serve Mango Muse Cake

Garnishes
There’s nothing like a few mango slices artfully fanned across the top, catching the light in that unmistakable golden hue. A scattering of mint sprigs adds both color and a cool aroma. If you’re feeling whimsical, a sprinkle of toasted coconut or edible flowers gives your Mango Muse Cake an instant glow-up.
Side Dishes
Keep things light yet celebratory: a handful of fresh berries, a scoop of vanilla ice cream, or a dollop of thick Greek yogurt tucked beside your Mango Muse Cake slice make the perfect partners. These simple sides let the mango flavor truly shine without overwhelming it.
Creative Ways to Present
Try cutting your Mango Muse Cake into petite squares for afternoon tea, or serve the whole cake on a rustic wooden board crowned with an avalanche of mango and mint. Feeling extra? Drizzle with passionfruit pulp or scatter candied ginger bits for a flavor twist that turns every sharing moment into an occasion.
Make Ahead and Storage
Storing Leftovers
Got a few slices left (lucky you)? Store them in an airtight container in the fridge, where they’ll stay fresh and soft for up to 4 days. The flavors mingle and deepen overnight, making day-two Mango Muse Cake almost as wonderful as when it’s just made.
Freezing
If you want to save your Mango Muse Cake for the future, wrap slices tightly with plastic wrap and foil, then stash them in the freezer for up to 3 months. For best results, freeze without the fresh mango or mint on top, and add them just before serving.
Reheating
Bring frozen cake out and let it thaw in the fridge overnight, or for a few hours at room temperature. Skip the microwave—just allow it to come to temp naturally and that creamy frosting and mango center will return to their best, luscious texture.
FAQs
Can I use store-bought mango purée?
Absolutely! Just pick an unsweetened purée for the Mango Muse Cake so you can control the level of sweetness. If it’s a bit watery, simmer it longer to thicken before using in your filling layer.
What’s the best way to cut mango for the topping?
For beautiful slices, choose ripe (but not mushy) mangos. Peel, then slice thin, fanning them out on your Mango Muse Cake for a look that’s pure summer.
Can I make the Mango Muse Cake ahead of time?
Yes! You can bake the cake layers and prepare the mango purée a day ahead. Store everything separately, then assemble with frosting and garnish the next day for best texture and freshness.
Is the recipe suitable for cupcakes?
It certainly is—just bake the batter in lined muffin tins for about 18–20 minutes. Add a spoonful of mango filling in the center and swirl on the cream cheese frosting for delightful mini Mango Muse Cakes!
What if I don’t have cream cheese for the frosting?
You can swap in mascarpone or a thick Greek yogurt, though the tang and body will change a bit. The Mango Muse Cake will still taste incredible—just adjust the sweetness as needed.
Final Thoughts
It’s hard not to smile when you share a homemade Mango Muse Cake—each slice is bright, fragrant, and absolutely loaded with joy. Whether it’s your first attempt or a new riff on a classic, I hope you give this recipe a go and make it part of your happiest celebrations!