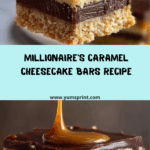
Imagine sinking your fork into a bar that layers buttery graham cracker crust, silky chocolate ganache, luscious cheesecake, oozy caramel, and a glossy chocolate glaze on top—these Millionaire’s Caramel Cheesecake Bars are the ultimate in indulgence. Every bite combines creamy cheesecake, rich caramel, and chocolatey decadence in a handheld treat that is perfect for special occasions, family gatherings, or whenever you want to wow your loved ones. Get ready for a taste experience that is truly worth its luxurious name!

Ingredients You’ll Need
You might be surprised by how simple the ingredient list for Millionaire’s Caramel Cheesecake Bars is. Each component, from the crust to the final chocolatey flourish, plays a crucial role in building layers of flavor, texture, and irresistible appeal.
- Graham cracker crumbs: Provide a crisp, buttery base that perfectly supports all those luscious layers above.
- Granulated sugar: Adds just the right amount of sweetness and helps the crust set up beautifully.
- Melted unsalted butter: Binds the crumbs together for a rich, golden crust with incredible flavor.
- Semi-sweet chocolate chips: Create the first smooth layer of chocolate that melds perfectly with the crust.
- Heavy cream: Used in both ganache layers, it ensures a creamy, luxurious texture and shine.
- Cream cheese: The star of the cheesecake layer, providing that classic, creamy tang.
- Vanilla extract: Rounds out and enhances all the flavors—don’t skip it!
- Large eggs: Hold the cheesecake layer together and add richness.
- Sour cream: Softens the texture and adds a subtle tang that balances the sweetness.
- Prepared dulce de leche or thick caramel sauce: Brings a gooey, sophisticated caramel flavor that takes these bars over the top.
- Semi-sweet chocolate, finely chopped: For the glossy ganache glaze that finishes these bars with a touch of elegance.
How to Make Millionaire’s Caramel Cheesecake Bars
Step 1: Prepare the Crust
Begin with the foundation: preheat your oven to 350°F (175°C) and line an 8×8 inch pan with parchment for easy removal later. Mix your graham cracker crumbs, sugar, and melted butter until the mixture looks like damp sand—this means it’ll pack down perfectly. Press it firmly and evenly into your pan, getting all the way to the corners. Bake for just 10 minutes, then let it cool while you prepare the next layer. A golden, fragrant crust is the perfect base for all the indulgent layers to come.
Step 2: Make the Chocolate Layer
For an ultra-decadent touch, make a simple ganache by pouring hot heavy cream over your chocolate chips. Let it sit to melt, then stir until smooth and glossy. Spread this dreamy chocolate layer over your cooled crust; it acts as a scrumptious buffer between the buttery base and the cheesecake while adding a wonderful flavor surprise when you take a bite. Chill the pan in the fridge to help the chocolate set while you whip up the creamy filling.
Step 3: Make the Cheesecake Layer
Start by beating softened cream cheese and sugar until totally smooth—you want zero lumps here for the silkiest cheesecake layer! Add vanilla for fragrance, then sour cream for a touch of tang and extra creaminess. Gently mix in the eggs, one at a time, being careful not to overmix (which can lead to cracks). Pour the decadent batter over your chilled chocolate layer and smooth the top for a perfectly even bake.
Step 4: Bake the Bars
Bake the pan for 30-35 minutes, until the edges are just set and the middle has a slight jiggle (think: the wobble of perfectly baked cheesecake). Turn off the oven, crack the door, and let the bars cool inside—this gentle cooling helps prevent cracks and keeps the cheesecake sumptuously creamy. Once cooled further on the counter, move the entire pan to the fridge for at least 4 hours, or go overnight for the absolute best texture and structure.
Step 5: Add Caramel and Ganache Glaze
Time for the “millionaire” finish! Blend dulce de leche with a bit of cream until it’s smooth and spreadable, then drizzle or spread over the chilled cheesecake. Next, make your final ganache with chopped chocolate and warmed cream, stirring until it’s shiny and luscious. Pour over the caramel layer, swirling gently to cover every corner. Each bite delivers a little of everything: creamy, gooey, and chocolatey decadence!
Step 6: Chill and Serve
Let the assembled Millionaire’s Caramel Cheesecake Bars chill once more so the ganache sets up with a beautiful, glossy finish. When ready to serve, lift the bars out using the parchment “handles” and slice into neat squares. Every layer will reveal itself in stunning, mouthwatering fashion!
How to Serve Millionaire’s Caramel Cheesecake Bars

Garnishes
Go ahead and play dress-up: a light sprinkle of flaky sea salt amplifies the caramel, while a few chocolate shavings or a dusting of cocoa powder adds extra allure. For true showstoppers, try a dollop of whipped cream and a drizzle more caramel on each bar.
Side Dishes
Since these bars are rich and satisfying, keep your sides simple. Serve with a fresh fruit salad, berries, or perhaps a scoop of vanilla ice cream if you’re really feeling decadent. Hot coffee or cool milk balances everything out.
Creative Ways to Present
Cut the bars into elegant rectangles and arrange on a tiered stand for a tea party, or serve in cupcake liners for a party-ready, grab-and-go treat. Mini bars are perfect for gifting—wrap them in parchment and tie with baker’s twine for a sweet surprise!
Make Ahead and Storage
Storing Leftovers
Once you’ve enjoyed a few Millionaire’s Caramel Cheesecake Bars, store any extras in an airtight container in the refrigerator. They’ll stay fresh, creamy, and delicious for up to five days—if they last that long!
Freezing
To freeze, simply layer the cut bars between sheets of parchment or wax paper, place in a freezer-safe container, and freeze for up to two months. Thaw slices in the fridge overnight for a treat that tastes as good as the day they were made.
Reheating
While there’s no need to reheat (these bars are best served chilled), if you love a slightly warmer, meltier texture, let a bar sit at room temperature for 10-15 minutes before eating. Avoid microwaving, which can cause the caramel and chocolate to separate.
FAQs
Can I use homemade caramel instead of store-bought dulce de leche?
Absolutely! If you have a favorite homemade caramel sauce recipe, feel free to use it in place of dulce de leche. Just make sure it’s thick enough to spread or drizzle neatly over the cheesecake layer.
What if I don’t have graham crackers for the crust?
You can substitute digestive biscuits, vanilla wafers, or even shortbread cookies. Just crush them finely and use the same measurements as you would for the graham crackers.
Can I make Millionaire’s Caramel Cheesecake Bars gluten-free?
Definitely! Use gluten-free graham crackers or cookies for the crust and double-check that your chocolate and caramel ingredients are certified gluten-free.
How do I cut the bars cleanly?
For bakery-worthy squares, run a sharp knife under hot water and wipe it dry before each cut. This way, each slice of Millionaire’s Caramel Cheesecake Bars will have clean edges and defined layers.
Can I double the recipe for a crowd?
Yes, just use a 9×13 inch pan and double every ingredient. Keep an eye on the baking time for the cheesecake layer—it may need a few extra minutes depending on your oven.
Final Thoughts
If you’re craving an unforgettable treat that looks as stunning as it tastes, give these Millionaire’s Caramel Cheesecake Bars a try. They’re as fun to make as they are to share, and you’ll find yourself reaching for this recipe whenever you want to impress or indulge. Happy baking!