If you’re looking for a treat that combines creamy peanut butter, luscious chocolate, and a dreamy cheesecake filling, these No-Bake Buckeye Cheesecake Bars will absolutely steal your heart! Layered and decadent without ever turning on the oven, this crowd-pleasing dessert is as easy as it is irresistibly delicious. With a classic chocolatey base, a fluffy peanut butter cheesecake center, and that signature glossy chocolate-peanut butter topping, every bite is guaranteed to make you swoon. Whether you’re bringing them to a party or spoiling yourself at home, these bars are the best way to satisfy your sweet tooth with minimal effort.

Ingredients You’ll Need
One of my favorite things about No-Bake Buckeye Cheesecake Bars is just how simple the ingredient list is. Each component brings its own little magic to the party, creating a dessert that’s both eye-catching and seriously delicious. Here’s what you’ll need and why you’ll love it:
- Chocolate graham cracker crumbs: These give your crust that rich, deep chocolate flavor and a hint of crunch.
- Unsalted butter, melted: This is the secret behind that perfectly moist, cohesive crust that holds everything together.
- Cream cheese, softened: The creamy base for the cheesecake layer, giving it tang and a silky texture.
- Creamy peanut butter: Adds irresistible flavor to both the filling and the topping, making every bite pure peanut-butter bliss.
- Powdered sugar: Sweetens the filling while keeping it smooth and airy—no grittiness at all.
- Vanilla extract: Just a splash is enough to round out the flavors and add warmth.
- Whipped topping: Makes the filling extra light and fluffy—essential for that no-bake cheesecake texture.
- Semi-sweet chocolate chips: Bring a glossy, fudgy top layer and balance out the sweetness in the filling perfectly.
- Whole peanuts: Sprinkle these on for a touch of crunch and a finishing flourish that looks as fun as it tastes!
How to Make No-Bake Buckeye Cheesecake Bars
Step 1: Prepare the Baking Dish
Start by lining an 8×8 inch baking dish with parchment paper. Be sure to let the edges overhang the sides, which will make it so much easier to lift out your No-Bake Buckeye Cheesecake Bars when they’re ready to slice. This little prep detail saves you from any serving struggles later!
Step 2: Make the Chocolate Crust
In a mixing bowl, stir together the chocolate graham cracker crumbs with the melted butter until the texture is like wet sand. Pour the mixture into your prepared dish and press it down firmly and evenly. The back of a spoon works wonders for getting it nice and level. Pop the crust into the fridge to chill while you whip up the filling—this helps the base stay crunchy and cohesive once assembled.
Step 3: Whip Up the Peanut Butter Cheesecake Filling
Grab a large mixing bowl and beat together the softened cream cheese, peanut butter, powdered sugar, and vanilla extract. Keep blending until the mixture looks smooth and light—no lumps allowed! Gently fold in the whipped topping so your cheesecake layer stays fluffy and airy, not dense. Spread this dreamy peanut butter goodness evenly over your chilled crust.
Step 4: Create the Signature Chocolate-Peanut Butter Topping
In a microwave-safe bowl, combine the chocolate chips and two tablespoons of peanut butter. Heat in short bursts, stirring after each, until the mixture is melted and velvety-smooth. Pour this glossy topping over the cheesecake layer, then use an offset spatula or the back of a spoon to spread it out in a gorgeous, even layer.
Step 5: Chill, Slice, and Garnish
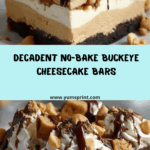
Now’s the hardest part: the waiting! Return the pan to the refrigerator and let the bars chill for at least four hours—overnight is even better if you have the patience. Once set, use the parchment to lift out the whole pan, then cut into neat squares. Top each piece with a little whipped topping and a few whole peanuts for a show-stopping finish. Time to dig in!
How to Serve No-Bake Buckeye Cheesecake Bars

Garnishes
For a truly irresistible finish, don’t skip the garnishes! A swirl of extra whipped topping on each square looks beautiful and adds a creamy touch. Sprinkle a few whole peanuts over the top for a salty crunch and a classic buckeye nod. If you’re feeling EXTRA, a dusting of cocoa powder or even a few mini chocolate chips turns these bars into total showstoppers.
Side Dishes
These bars are rich enough to stand on their own, but if you’re serving them at a party, fresh berries or a tangy fruit salad make a fabulous pairing. Their bright, tart flavors are the ideal counterpoint to the sweet, creamy richness of No-Bake Buckeye Cheesecake Bars. A good cup of coffee or a tall glass of cold milk never goes amiss, either!
Creative Ways to Present
No-Bake Buckeye Cheesecake Bars are an instant hit on a dessert tray, but you can also get creative. Try cutting them into tiny, bite-sized cubes and skewering them on toothpicks for a fun party treat. Or, serve them layered in mini parfait glasses with extra whipped topping for a pretty presentation. However you arrange them, they always bring smiles.
Make Ahead and Storage
Storing Leftovers
If you somehow manage to have leftovers (it’s rare!), store your No-Bake Buckeye Cheesecake Bars in an airtight container in the refrigerator. They’ll stay fresh and delicious for up to five days, making them the perfect make-ahead treat.
Freezing
You can freeze these bars for even longer storage! Simply wrap individual squares tightly in plastic wrap and then pop them into a freezer-safe bag. They’ll keep their dreamy texture for up to two months. For best results, thaw them in the fridge overnight before serving.
Reheating
No reheating required! These bars are just as luscious straight from the fridge (in fact, they taste best when well chilled). If you’ve frozen them, let them come up to temperature in the refrigerator for a few hours before enjoying.
FAQs
Can I use regular graham crackers instead of chocolate?
Absolutely—regular graham crackers work well if that’s what you have on hand. Your crust will be a bit lighter in color and flavor, but still plenty delicious with the peanut butter and chocolate layers.
Can I swap out the whipped topping for homemade whipped cream?
Yes! Whipped topping makes things super easy, but homemade whipped cream (sweetened, and whipped until it holds peaks) lends an even richer, fresher flavor to these No-Bake Buckeye Cheesecake Bars.
Can I make these bars gluten-free?
Definitely! Just use your favorite gluten-free chocolate cookie crumbs for the crust, and double-check that all other ingredients are gluten-free. The results will be every bit as tasty.
How long does it really take for the bars to set?
Four hours is the minimum, but if you can chill them overnight, the texture becomes even firmer and easier to slice. Patience pays off here!
Can I add extra mix-ins to the cheesecake layer?
Why not! Chopped peanut butter cups, mini chocolate chips, or even a swirl of caramel can make these bars your own ultimate creation. Just avoid too many additions—they may affect the set of the filling.
Final Thoughts
If you’re craving a dessert with classic flavors and a wow-factor finish, you truly can’t go wrong with No-Bake Buckeye Cheesecake Bars. They’re simple, striking, and absolutely delicious. Trust me—once you share these bars with family and friends, everyone will be begging for the recipe!