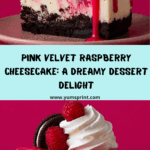
Get ready to fall in love bite by bite with this Pink Velvet Raspberry Cheesecake. Imagine fluffy, rosy-hued velvet cake sandwiching a dreamy, tangy raspberry cheesecake layer, all wrapped in fluffy cream cheese frosting, finished with fresh berries and curls of white chocolate. Whether it’s a birthday, bridal shower, or just a treat-yourself weekend, this dessert is a showstopper. It’s vibrant, festive, and incredibly delicious—every forkful is a celebration of sweet-tart raspberry with just the right hint of chocolatey richness from that unforgettable pink velvet.
Ingredients You’ll Need

Ingredients You’ll Need
This Pink Velvet Raspberry Cheesecake is as dazzling as it is easy to make, thanks to familiar, straightforward ingredients. Each component brings its own magic, from the creamy tang of cheesecake to the moist, colorful crumb of velvet cake—trust me, you’ll taste the love in every layer.
- All-purpose flour: Provides structure for the pink velvet cake layers and keeps them perfectly tender.
- Granulated sugar: Sweetens both cake and cheesecake while aiding in delicate texture.
- Baking soda & baking powder: Give the cake that essential lift for a soft, airy crumb.
- Salt: Enhances flavor and balances sweetness throughout the cake and cheesecake alike.
- Large eggs: Bind the batters and contribute richness to each luscious bite.
- Vegetable oil: Keeps the cake layers moist and plush—no dryness here!
- Buttermilk: Adds both acidity for lightness and a classic velvet cake tang.
- Vanilla extract: Infuses every layer with a warm, irresistible aroma.
- Pink food coloring: Transforms the cake layers into a delightful rosy celebration.
- Cream cheese: The heart of the cheesecake and frosting, it creates a creamy, tangy base that pairs perfectly with raspberries.
- Sour cream: Brings an extra layer of creaminess and tangy depth to the cheesecake.
- Raspberry purée: Adds real raspberry flavor and the prettiest pale pink blush to your cheesecake layer.
- Powdered sugar: Sweetens the frosting while keeping it cloud-like and smooth.
- Unsalted butter: Helps the frosting whip up silky and spreadable, balancing out the cream cheese tang.
- Heavy cream: Gives you the perfect frosting texture if things get a little thick while mixing.
- Fresh raspberries: For a bright finishing touch and a pop of fresh berry flavor.
- Pink velvet cake crumbs: For a playful, textured look and extra velvet cake flavor on top.
- White chocolate shavings (optional): Lends a touch of elegance and creamy sweetness to your finished cheesecake.
How to Make Pink Velvet Raspberry Cheesecake
Step 1: Bake the Raspberry Cheesecake Layer
Begin your Pink Velvet Raspberry Cheesecake adventure with the cheesecake layer—it’s what makes this dessert spectacular! Preheat your oven to 325°F (160°C), then line a 9-inch springform pan with parchment (so you can transfer it easily later). Beat softened cream cheese and sugar together until completely smooth and fluffy, scraping the bowl as you go. Add eggs one at a time for that perfectly blended, creamy texture. Next, blend in the sour cream, vanilla, and the star: vibrant, strained raspberry purée. Pour the mixture into your pan and bake for 40-45 minutes, just until the cheesecake is set with a gentle wobble in the center. Cool completely, then chill for at least four hours or overnight—this ensures slicing perfection!
Step 2: Make the Pink Velvet Cake Layers
Now for those stunning pink velvet layers! Increase your oven temperature to 350°F (175°C), and prepare two 9-inch cake pans with grease and parchment. In a large bowl, whisk together the dry ingredients: flour, sugar, baking soda, baking powder, and salt. In a separate bowl, combine eggs, vegetable oil, buttermilk, vanilla extract, and as much pink food coloring as you want to create your ideal shade (I love going for a bold blush). Gently mix the wet and dry together—don’t overmix! Divide the batter between the two pans and bake for 25-30 minutes, until a toothpick inserted comes out clean. Let cakes cool fully so assembly is a breeze.
Step 3: Whip Up the Cream Cheese Frosting
Time for the dreamiest finishing touch: cream cheese frosting! Beat together softened cream cheese and butter until they’re absolutely creamy and lump-free. Gradually add sifted powdered sugar, blending until smooth and fluffy. Splash in the vanilla, then adjust the texture with a tablespoon or two of heavy cream if your frosting needs to be extra smooth. It should be sturdy enough to hold its shape but silky and spreadable.
Step 4: Assemble the Pink Velvet Raspberry Cheesecake
Now comes the fun part—layering all the goodness! Start by placing a pink velvet cake layer on your serving plate. Spread a thin layer of cream cheese frosting over the top (it’ll help the layers stick together). Gently place the chilled raspberry cheesecake on top, then cap everything with the second pink velvet cake layer. Take a deep breath—you’re only a few steps away from the finish line!
Step 5: Frost and Decorate
Generously frost the entire cake with your luscious cream cheese frosting, making sure to smooth out the sides and top. For a Pinterest-worthy finish, press cake crumbs along the bottom edge, scatter fresh raspberries on top, and sprinkle with white chocolate shavings if you want a little extra pizzazz. This Pink Velvet Raspberry Cheesecake looks just as good as it tastes!
Step 6: Chill Before Slicing
Pop your finished masterpiece in the fridge for at least 30 minutes to help the layers set and make slicing super clean. Now, all that’s left is to slice up a piece and savor every bite!
How to Serve Pink Velvet Raspberry Cheesecake
Garnishes
Garnishing this show-off dessert is half the fun! Top your Pink Velvet Raspberry Cheesecake with a handful of plump, juicy raspberries, a flurry of pretty pink velvet cake crumbs, and a flirty sprinkle of white chocolate shavings. Not only does it look jaw-droppingly gorgeous, but the mix of creamy, crunchy, and fruity is irresistible on your fork.
Side Dishes
Keep things light and fresh with simple sides: think bowls of mixed berries, a tart raspberry sauce for drizzling, or even a scoop of vanilla bean or raspberry sorbet. This cheesecake is rich and decadent, so something bright and simple alongside really lets those flavors shine.
Creative Ways to Present
Hosting a special occasion? Transform your Pink Velvet Raspberry Cheesecake into personal mini cakes by using a cookie cutter on chilled slices, or layer cubes of cake and cheesecake in parfait glasses for a playful, no-fuss dessert. You can even place individual slices on vintage plates with edible flowers for an extra-special, Instagram-worthy touch!
Make Ahead and Storage
Storing Leftovers
Store any leftover Pink Velvet Raspberry Cheesecake covered and chilled in the refrigerator. An airtight container works best to keep the cake moist and the cheesecake layer perfectly creamy. It’ll stay delicious for up to 4 days—though good luck keeping it around that long!
Freezing
You can freeze the whole cake or individual slices for later! Wrap tightly in plastic wrap and foil, then freeze for up to one month. Thaw overnight in the refrigerator before serving. The texture holds up beautifully, especially if you add garnishes after thawing.
Reheating
No reheating is necessary—this cheesecake is best enjoyed chilled. If you prefer a softer texture, let your slice sit at room temperature for 15-20 minutes before diving in for ultimate creaminess!
FAQs
Can I use frozen raspberries for the cheesecake layer?
Absolutely! Just thaw them completely and blend into a purée, straining out any seeds. Frozen raspberries are often just as flavorful as fresh, giving your cheesecake layer all the zing it needs.
Do I need to use a springform pan for the cheesecake?
A springform pan makes it much easier to unmold the cheesecake layer and assemble the cake, giving you those perfect, bakery-style layers. If you’re in a pinch, you can use a regular cake pan lined with a sling of parchment for easy lifting.
How can I make the pink color more vibrant?
The magic is in the food coloring! Feel free to adjust the amount to achieve your dream shade; gel-based pink coloring works best for bold, uniform color without watering down your batter.
Can I make the cake and cheesecake layers ahead of time?
Yes—both components can be prepared in advance. Store the cake layers tightly wrapped at room temperature for up to a day or freeze for longer storage. The cheesecake layer can be chilled overnight or frozen until you’re ready to assemble.
What can I substitute for buttermilk?
If you’re out of buttermilk, just add a tablespoon of lemon juice or white vinegar to a cup of milk, let it sit for 5 minutes, and use it as a homemade swap. This keeps your pink velvet cake just as tender and tasty!
Final Thoughts
If you’re searching for a stunning centerpiece dessert that’s as fun to make as it is to eat, you’ll adore this Pink Velvet Raspberry Cheesecake. Every layer is a little celebration, and sharing a slice is like giving someone a pink-hued hug. Go ahead—invite friends, pour tea, and savor every fabulous bite!