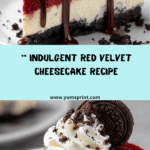
Prepare to fall head over heels with the showstopping Red Velvet Cheesecake. This luxurious dessert brings together the classic, cocoa-kissed charm of red velvet cake and the creamy, tangy richness of cheesecake, all in one glorious slice. With its striking layers and irresistibly smooth texture, it’s a truly unforgettable treat that will impress at any gathering or just make an ordinary day feel special.

Ingredients You’ll Need
The ingredients for this Red Velvet Cheesecake are simple but purposeful—each one lends something vital, from the bold color and velvety crumb to the lush, creamy filling. You’ll find most components are kitchen staples, but together they create pure magic.
- All-purpose flour: Forms the foundational crumb structure of the red velvet layer, giving it that signature tenderness.
- Granulated sugar: Sweetens both the cake and cheesecake layers, balancing cocoa and tangy notes perfectly.
- Baking soda: Works with vinegar to give the cake its soft rise and plush texture.
- Cocoa powder: Just a touch provides subtle chocolate flavor and that signature red velvet taste.
- Salt: Enhances and sharpens all the other flavors, making each bite pop.
- Vegetable oil: Keeps the cake layer moist for days, ensuring every forkful is luscious.
- Buttermilk: Adds a slight tang that reacts with the baking soda and complements the cheesecake beautifully.
- Large eggs: Bind everything together in both cake and cheesecake, creating structure and silkiness.
- White vinegar: The magic ingredient that reacts with baking soda for fluffiness in the red velvet layer.
- Vanilla extract: Infuses both layers and the frosting with aromatic warmth.
- Red gel food coloring: Gives the cake its vibrant, iconic hue—use as much or little as you like for that perfect red.
- Cream cheese: Essential for the cheesecake and frosting, lending decadent tang and creamy smoothness.
- Sour cream: Softens the cheesecake filling’s texture, keeping it irresistibly creamy.
- Unsalted butter: For the frosting, providing richness and stability.
- Powdered sugar: Sweetens and thickens the frosting to fluffy perfection.
- Optional garnish: Red velvet cake crumbs, white chocolate curls, or fresh berries for an elegant finish.
How to Make Red Velvet Cheesecake
Step 1: Preheat and Prep
Kick things off by preheating your oven to 325°F (160°C). Grab a 9-inch springform pan, generously grease it, and pop a round of parchment paper at the bottom. This little step is the secret to smooth, easy removal once your Red Velvet Cheesecake is ready to steal the spotlight.
Step 2: Mix the Red Velvet Cake Batter
In one large bowl, whisk together the flour, sugar, cocoa powder, baking soda, and salt—these are your dry ingredients. In another bowl, combine the oil, buttermilk, eggs, vinegar, vanilla extract, and that show-stopping red food coloring. Gently blend the wet and dry until you have a smooth, vibrant batter. This is where the magic starts to happen.
Step 3: Bake the Red Velvet Base
Carefully pour half of your red velvet batter into the prepared pan. Slide it into the oven for a 20-minute bake. This creates a sturdy but tender base for your cheesecake, so let it cool slightly (and resist nibbling!) while you move to the next step.
Step 4: Make the Cheesecake Filling
In a fresh mixing bowl, beat the softened cream cheese and sugar until glossy and lump-free. Add in sour cream, vanilla, and then the eggs one at a time, beating gently after each. The trick here is not to overmix; smooth is the goal, but too much air invites cracks during baking.
Step 5: Assemble the Cheesecake Layers
Pour your creamy cheesecake batter on top of the slightly cooled red velvet base. Use a spatula to gently smooth the surface, layering evenly so every slice is a thing of beauty.
Step 6: Bake Low and Slow
Set the pan inside a larger baking dish, then fill that dish halfway with steaming hot water for a gentle water bath. Bake for 55–65 minutes. You’ll know it’s done when the outer edges are set and the center has a soft wobble—don’t worry, it will firm up perfectly as it chills.
Step 7: Cool and Chill
Turn off the oven, crack the door, and let your cheesecake rest in the gentle warmth for about 1 hour. Then, remove from the water bath, let it cool completely on the counter, and finally, refrigerate for at least 4 hours (but overnight is best for buttery-smooth slices).
Step 8: Whip Up the Cream Cheese Frosting (Optional)
For those who love a little extra decadence, beat together softened cream cheese and butter, then add powdered sugar and vanilla. Whip until pale, fluffy, and impossible to resist. Spread over your chilled cheesecake or get creative with some decorative piping for a bakery-worthy finish.
Step 9: Garnish and Slice
Finish with a flourish—scatter red velvet crumbs, swirl on white chocolate curls, or toss on a few fresh berries. To serve beautiful slices, dip your knife in hot water and wipe between cuts for a clean, showy edge.
How to Serve Red Velvet Cheesecake

Garnishes
Your Red Velvet Cheesecake deserves to be dressed up! Classic choices include a sprinkle of red velvet cake crumbs, delicate white chocolate curls, or a smattering of vibrant, fresh berries. Each one provides a pleasing contrast in texture and color, and if you’re feeling fancy, a drizzle of dark chocolate sauce is always a good idea.
Side Dishes
This dessert is rich and memorable all on its own, but if you’re serving a crowd, consider pairing slices with light, bright side dishes. Think a bowl of mixed berries, a spoonful of tangy raspberry coulis, or a scoop of vanilla bean ice cream that balances the creamy decadence of the cheesecake.
Creative Ways to Present
To truly wow your guests, assemble a dramatic dessert platter with alternating slices of Red Velvet Cheesecake and traditional cheesecake, or serve individual mini versions in jars for a playful twist. For special occasions, try layering cubes into a trifle with whipped cream and berries for a showstopper centerpiece.
Make Ahead and Storage
Storing Leftovers
Your Red Velvet Cheesecake will hold up beautifully for several days in the refrigerator. Simply cover the pan tightly with plastic wrap or transfer slices to an airtight container. This helps keep the cake moist and the cheesecake luscious, while the flavors meld and intensify each day.
Freezing
If you need to make ahead or have leftovers (lucky you!), cheesecake freezes wonderfully. Wrap individual slices or the whole cheesecake in plastic wrap and a layer of foil, then freeze for up to two months. Thaw overnight in the fridge before serving for best results—the texture stays remarkably creamy!
Reheating
Red Velvet Cheesecake is best served chilled, but if you prefer a slightly warmer, softer dessert, allow slices to sit at room temperature for about 30 minutes before eating. There’s no need to microwave—let the natural creaminess shine!
FAQs
Can I use liquid food coloring instead of gel?
Yes, you can use liquid food coloring if that’s what you have on hand, but you may need to add a bit more to achieve the deep red hue. Gel food coloring is more concentrated, so it gives you vibrant color with less liquid, which is perfect for maintaining the cake’s texture.
Do I really need a water bath for this recipe?
A water bath isn’t strictly necessary, but it does help the cheesecake bake evenly and prevents cracks on top. If you skip the water bath, just keep a close eye toward the end of baking and know that a few cracks won’t affect the incredible taste!
Can I substitute Greek yogurt for sour cream?
Absolutely! Greek yogurt makes a great stand-in for sour cream in the cheesecake layer. It’ll add comparable tang and creaminess, so go ahead and use what’s in your fridge.
How do I make mini Red Velvet Cheesecakes?
You can divide the cake and cheesecake batter among muffin tins or small springform pans. Just reduce the baking time—start checking at around 20 minutes for the minis, and chill thoroughly before serving for best results.
Is the cream cheese frosting essential?
While the frosting adds an extra layer of decadence, the Red Velvet Cheesecake is perfectly delicious without it. For a lighter dessert, skip it or simply dust with powdered sugar and some fresh berries for a beautiful, effortless finish.
Final Thoughts
I hope you’re as excited as I am to slice into this Red Velvet Cheesecake. It’s a dessert that truly delivers on both flavor and drama, making any occasion feel like a celebration. Give it a try, share it with loved ones, and get ready to impress—one dreamy, velvety bite at a time!