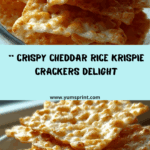
Get ready to meet your latest snacking obsession: Rice Krispie Cheddar Crackers! These treats wrap up buttery richness, sharp cheesy flavor, and the unexpected crunch of crispy cereal all in one bite. There’s something a little magical in the way these simple ingredients transform into golden, savory crackers—perfect for parties, lunchboxes, or stealing straight from the tin while standing in the kitchen. If you love your snacks with a homemade, irresistibly crunchy twist, you’ll want to make a double batch!
Ingredients You’ll Need

Ingredients You’ll Need
Every great cracker starts with top-notch ingredients, and this recipe for Rice Krispie Cheddar Crackers is all about maximizing flavor with a handful of easy-to-find staples. Each ingredient plays a key role, from creamy butter to that signature cereal crunch, so don’t skimp on quality!
- Shredded sharp cheddar cheese: This brings big bold cheesy flavor—sharp cheddar melts smoothly and delivers a punchy bite.
- Butter (softened): The secret to a flaky, tender texture and rich, melt-in-your-mouth sensation.
- All-purpose flour: Provides the structure, keeping your crackers tender yet crisp.
- Salt: Just a pinch amps up the cheesy kick and brings all the flavors together.
- Rice Krispies cereal: The star ingredient giving these crackers that addictive, airy crunch you won’t find in any store-bought version.
How to Make Rice Krispie Cheddar Crackers
Step 1: Cream Cheese and Butter
Start off by combining your softened butter and shredded cheddar in a large mixing bowl. A hand mixer makes this a breeze, but a wooden spoon and some elbow grease work just as well. Blend everything together until the mixture is creamy, fluffy, and streak-free—this will help the crackers bake up super tender.
Step 2: Add Dry Ingredients
Next, sprinkle in your flour and salt. Mix gently just until the flour is absorbed and the dough looks cohesive; overmixing can make crackers tough. You’re looking for a soft but stiff dough that comes together without being sticky.
Step 3: Fold in Rice Krispies
Here’s where the Rice Krispie Cheddar Crackers become something special: add the Rice Krispies and fold them in gently. Use a spatula and take care not to crush the cereal, as you want to preserve those little pockets of crunch throughout the crackers. It should look chunky and a bit rustic—perfect!
Step 4: Form and Flatten
Scoop out heaping teaspoons of dough and roll between your palms into balls, then line them up on an ungreased baking sheet. Now, the fun part: flatten each ball just a bit with your fingers or a fork. Don’t worry about making them identical—some personality is encouraged!
Step 5: Bake to Golden Perfection
Slide your tray into a preheated 350°F (175°C) oven and let the crackers bake for 12 to 15 minutes. They should look glossy, golden around the edges, and smell absolutely incredible. Transfer to a wire rack to cool completely before digging in—the crunch will intensify as they cool!
How to Serve Rice Krispie Cheddar Crackers
Garnishes
While they’re delicious as-is, try topping your Rice Krispie Cheddar Crackers with a sprinkle of cracked black pepper or a pinch of smoked paprika before baking for extra personality. A quick dusting of grated parmesan hot from the oven can also boost that irresistible cheesy aroma.
Side Dishes
These crackers are perfectly snackable on their own, but they also shine on a cheese board alongside grapes, figs, and cured meats. They hold up beautifully next to a creamy tomato soup or vibrant green salad, adding a crunchy, savory note to lighter dishes.
Creative Ways to Present
Think outside the box by stacking Rice Krispie Cheddar Crackers with a thin slick of fig jam, layering them as mini sandwich bites, or packing them in cellophane bags as edible party favors. Their rustic look and playful crunch make them a charming homemade gift.
Make Ahead and Storage
Storing Leftovers
Keep any extra crackers in an airtight container at room temperature. They’ll stay fresh and crunchy for up to five days—if you can resist snacking on them every time you walk past!
Freezing
Rice Krispie Cheddar Crackers freeze surprisingly well. Stack cooled crackers in a zip-top freezer bag and freeze for up to two months. Pop out a handful anytime you need a quick, homemade snack or party platter addition.
Reheating
To revive the crunch, spread crackers on a baking sheet and warm in a 300°F (150°C) oven for 3–5 minutes. Let them cool, and they’ll be almost as crisp as the day you baked them.
FAQs
Can I use a different type of cheese?
Absolutely! While sharp cheddar packs the most flavor, feel free to use a smoked gouda, pepper jack, or even a dairy-free cheese alternative. Just keep in mind that different cheeses may melt or brown differently, so watch your first batch closely.
My dough seems too dry or crumbly. What should I do?
If your dough isn’t holding together, add a teaspoon or two of milk or water to bring it together. Sometimes, mis-measuring flour or a slightly dry cheese can absorb more moisture than expected.
Can I make the dough in advance?
Yes! Prepare the dough for Rice Krispie Cheddar Crackers up to 24 hours ahead and chill, tightly wrapped, in the refrigerator. Allow it to warm at room temperature for about 15 minutes before shaping and baking.
Are Rice Krispie Cheddar Crackers gluten-free?
As written, this recipe uses all-purpose flour and regular Rice Krispies, which may contain gluten. To make them gluten-free, substitute with a 1:1 gluten-free flour and gluten-free crisped rice cereal—check labels to ensure there’s no hidden gluten.
Can I double this recipe for a party?
Definitely! This recipe scales up beautifully for a crowd. Just use a large mixing bowl and bake in batches, watching the bake time as ovens can vary when loaded up with extra trays.
Final Thoughts
There’s something joyful about baking a tray of Rice Krispie Cheddar Crackers—simple ingredients come together for outrageously good flavor and crunch. Don’t wait for a special occasion to try them; jump in and treat yourself to a homemade snack that’s as much fun to bake as it is to eat!