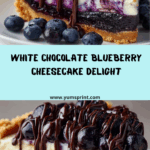
There’s something utterly magical about a slice of White Chocolate Blueberry Cheesecake. This dessert elegantly balances the creaminess of rich white chocolate and tangy cheesecake filling, all laced with a vibrant blueberry swirl. Each bite offers a symphony of textures—from the buttery graham cracker crust to the luscious filling and fruity ribbons—and it never fails to steal the show at gatherings. Trust me, this is a showstopper that’s as beautiful as it is irresistibly delicious!

Ingredients You’ll Need
Part of the wonder of this White Chocolate Blueberry Cheesecake is how it transforms a handful of straightforward ingredients into a true gourmet experience. Every component, from the graham cracker base to the fresh berries, plays a role in building flavor and creating that signature marbled appearance.
- Graham cracker crumbs: Provide the classic, snappy foundation for the cheesecake—feel free to swap in digestive biscuits if you’d like a touch of malty flavor.
- Granulated sugar: Balances tartness in the filling and brings sweetness to every layer.
- Unsalted butter: Binds the crust, adding richness and helping it set up perfectly.
- Cream cheese: The heart of any cheesecake—softened, it creates the creamy, dreamy texture we all crave.
- Vanilla extract: Adds a cozy, aromatic undertone that enhances the overall profile.
- Eggs: Give structure and silkiness to the cheesecake filling.
- Sour cream: Infuses gentle tang, which counterpoints the sweetness of the white chocolate.
- Heavy cream: Delivers extra smoothness and decadent mouthfeel.
- White chocolate: A star player—adding a luscious sweetness and creamy notes that pair beautifully with blueberries.
- All-purpose flour: Helps the cheesecake set and keeps the slices neat and creamy.
- Fresh or frozen blueberries: These burst with flavor in every swirl, giving you that signature fruit pop in every bite.
- Cornstarch: Thickens the blueberry mixture, making the swirl stand out visually and texturally.
- Water: Helps create the perfect blueberry sauce consistency.
- Lemon juice: Brightens up the blueberry layer, keeping flavors lively.
- Fresh blueberries, white chocolate curls, whipped cream (garnish): These add the final flourish, making every slice look as special as it tastes.
How to Make White Chocolate Blueberry Cheesecake
Step 1: Prepare the Crust
Let’s get started on the foundation. Preheat your oven to 325°F (160°C) and prep a 9-inch springform pan by greasing it and lining the bottom with parchment—this makes unmolding a breeze! Mix together your graham cracker crumbs, sugar, and melted butter until they resemble damp sand, then press the mix firmly into the pan. Bake for 10 minutes to set it, then let it cool as you move on. This crust is crucial—it adds a crunchy contrast to the creamy filling!
Step 2: Make the Blueberry Swirl
Now for the fun part: that dazzling blueberry swirl! Combine blueberries, sugar, cornstarch, water, and lemon juice in a saucepan and cook over medium heat. Stir, watch the berries burst (the kitchen will smell amazing!), and keep going until the sauce thickens—about 6–8 minutes. At this point, you can strain the sauce for a silkier look or leave the berries in for extra texture, then let it cool completely.
Step 3: Prepare the Cheesecake Filling
In a big bowl, beat the cream cheese until smooth and fluffy; don’t rush this part, as it makes all the difference. Add sugar and vanilla, blending until completely combined. Crack in the eggs one at a time (gentle on the speed!), followed by sour cream and heavy cream. Finally, stir in the melted white chocolate and flour. The batter should be impossibly creamy—this is where the white chocolate truly shines.
Step 4: Assemble the Cheesecake
Time to layer! Pour half the cheesecake filling over your cooled crust, then dollop half the cooled blueberry sauce over the filling. Swirl gently with a knife or skewer to get those beautiful ribbons. Repeat with the remaining batter and blueberry sauce for a stunning marbled finish. Don’t overmix—those swirls are your artwork!
Step 5: Bake the Cheesecake
To avoid cracks and ensure ultimate creaminess, use a water bath: place your springform pan inside a larger pan, fill the outer pan with about an inch of hot water, and bake for 60–70 minutes. You’re looking for set edges and a slightly wobbly center. Turn the oven off, leave the door ajar, and let your cheesecake cool for an hour to prevent sudden temperature changes (which cause cracks!).
Step 6: Chill and Garnish
Once cooled, run a knife around the edge to loosen, and pop the cheesecake in the fridge for at least four hours (overnight is always best for intense flavors and effortless slicing). Just before serving, crown your White Chocolate Blueberry Cheesecake with fresh berries, white chocolate curls, or a swoop of whipped cream!
How to Serve White Chocolate Blueberry Cheesecake

Garnishes
A flourish of fresh blueberries and swoops of cloud-like whipped cream create a show-stopping presentation, especially when paired with delicate white chocolate curls. The fresh garnishes not only dazzle the eyes but also add bursts of flavor that perfectly complement the creamy, tangy filling.
Side Dishes
Serve this cheesecake with a handful of lemon shortbread cookies or even a delicate fruit salad on the side for a light, palate-cleansing contrast. A hot cup of coffee or a glass of sparkling wine pairs beautifully, accentuating both the richness of the white chocolate and the tart blueberry swirl.
Creative Ways to Present
Try slicing the cheesecake into elegant bars for a buffet-style dessert table, or mini rounds for a dramatic plated finale. If you’re hosting a brunch, serve slices atop a bed of lemon zest-kissed Greek yogurt for a playful twist. There’s no wrong way to show off your White Chocolate Blueberry Cheesecake masterpiece!
Make Ahead and Storage
Storing Leftovers
Store leftover White Chocolate Blueberry Cheesecake, covered, in the refrigerator for up to five days. I recommend placing parchment between sliced pieces to keep the swirls pristine and the texture ultra-creamy.
Freezing
Cheesecake freezes beautifully! Simply wrap individual slices (or the whole cheesecake) tightly in plastic wrap and foil, then freeze for up to two months. To serve, thaw overnight in the fridge—and add fresh garnishes just before bringing it to the table for best appearance.
Reheating
Since cheesecake is best served chilled, there’s usually no need to reheat. If you’d like your slice just slightly warmer, let it sit at room temperature for 20–30 minutes before serving—this brings out even more of that luscious white chocolate flavor!
FAQs
How do I prevent my cheesecake from cracking?
Always bake your cheesecake in a water bath and cool it slowly in the oven with the door ajar. This gentle cooling prevents sudden temperature changes that cause cracks. Also, avoid overbeating the batter so you don’t incorporate too much air.
Can I use frozen blueberries for the swirl?
Absolutely! Frozen blueberries work just as well as fresh. No need to thaw—just toss them into the saucepan with the other ingredients, and they’ll meld down beautifully for your swirl.
Is it possible to make this cheesecake gluten-free?
Yes! Simply swap in gluten-free graham crackers for the crust and use a cup-for-cup gluten-free flour blend in place of the all-purpose flour. The rest of the White Chocolate Blueberry Cheesecake recipe stays unchanged.
What’s the best way to cut clean slices?
Use a long, sharp knife dipped in hot water and dried between each cut. This trick ensures neat, picture-perfect portions, and preserves those gorgeous blueberry swirls in every slice!
Can I make the cheesecake ahead of time?
Definitely—White Chocolate Blueberry Cheesecake is actually even better when made the day before. The flavors deepen and meld, and slicing is so much easier when fully chilled.
Final Thoughts
Desserts like this are meant to be shared, and I truly hope your White Chocolate Blueberry Cheesecake becomes a favorite at your table. With its swirls of berry, creamy filling, and elegant white chocolate touch, this treat is pure joy from the first glance to the last bite. Gather your ingredients and give it a whirl—you’re in for a delicious adventure!