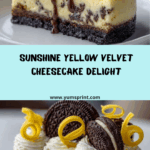
Meet your new showstopper dessert: the Yellow Velvet Cheesecake. Imagine the best of both worlds—a fluffy, buttery yellow velvet cake and a rich, creamy cheesecake—layered together in one gorgeous, sunny slice. The striking marigold hue just hints at the flavors inside: vanilla-scented, melt-in-your-mouth cake paired with cool, tangy cheesecake. Whether it’s for a party, birthday, or just a Tuesday that needs brightening, this recipe always dazzles.

Ingredients You’ll Need
The ingredients for Yellow Velvet Cheesecake are blissfully straightforward, but every one plays a critical role in building up those luscious textures and vibrant flavors. A few tips below will help you make each component shine just right.
- All-purpose flour: The backbone of your cake layer, giving structure and a tender crumb.
- Granulated sugar: Adds sweetness and helps create that perfect golden crust.
- Baking soda & baking powder: Your lift-off team for a light, lofty cake—don’t skip or substitute!
- Salt: Rounds out and emphasizes the vanilla and buttery flavors.
- Vegetable oil: Keeps the yellow velvet cake soft and moist without any greasiness.
- Buttermilk: Essential for that signature tenderness and gentle tang in the cake layer.
- Eggs: Bind everything together and lend richness to both the cake and cheesecake layers.
- Vanilla extract: Elevates everything with sweetly floral warmth—don’t be shy!
- White vinegar: Reacts with baking soda for extra fluffiness and a bright flavor pop.
- Yellow gel food coloring: For that “wow!” color; start slow and build up to the boldness you love.
- Cream cheese: The creamy heart of the cheesecake, providing that lush, tangy bite.
- Sour cream: Adds a subtle tang and silkiness, making the cheesecake irresistible.
- Powdered sugar (for frosting): Sifted for extra-smooth, pipeable frosting.
- Unsalted butter (for frosting): Lift your frosting with buttery silkiness.
- Optional Garnish: Finish with white chocolate curls, lemon zest, edible gold dust, or fresh berries for a picture-perfect touch.
How to Make Yellow Velvet Cheesecake
Step 1: Prepare Your Pan and Preheat
Begin by heating your oven to 325°F (160°C). Grease your 9-inch springform pan generously, then line the bottom with parchment paper. This not only ensures effortless removal but also protects your delicate cheesecake from sticking or cracking.
Step 2: Mix Up That Yellow Velvet Cake Batter
Whisk together your dry ingredients—flour, sugar, baking soda, baking powder, and salt—in a large bowl. In another, stir the buttermilk, oil, eggs, vinegar, and vanilla. Add enough yellow gel food coloring to the wet mixture to reach your perfect shade of sunshine (½ teaspoon is a good start). Gradually fold the dry into the wet until you have a smooth, dreamy batter with no lumps.
Step 3: Layer the First Cake Base
Pour about half the yellow velvet batter into the prepared pan, smoothing it gently to the edges. This becomes the sturdy-yet-tender base, ready to cradle your cheesecake filling.
Step 4: Blend Cheesecake Perfection
In a fresh bowl, beat together soft cream cheese and sugar until smooth with no lumps. Add the eggs, one at a time, mixing well after each, then blend in vanilla and sour cream. The mixture should be creamy, thick, and glossy—like sweet, rich silk.
Step 5: Assemble the Layers
Gently pour the cheesecake mixture over your yellow velvet layer in the pan, spreading evenly for perfect coverage. Carefully spoon the remaining cake batter on top, smoothing it out so your cheesecake layer is hidden like a decadent surprise.
Step 6: Bake in a Water Bath
Place your springform pan into a larger baking dish and pour hot water halfway up its sides. This steamy water bath keeps the Yellow Velvet Cheesecake ultra-creamy and prevents cracking as it bakes. Bake 60 to 70 minutes until the center is just set but still slightly wobbly.
Step 7: Cooling Down—Patience Pays Off
Turn off the oven, crack the door slightly, and let your cheesecake cool inside for about an hour. This gentle cooling process limits cracks. Remove, cool completely at room temperature, then chill in the refrigerator for at least 4 hours or overnight so the flavors meld and the texture sets to velvety perfection.
Step 8: Whip Up Brilliant Frosting (Optional, But Worth It!)
If you’re all about that extra finish, beat together cream cheese and butter until irresistibly fluffy. Add sifted powdered sugar in stages, then finish with vanilla and a few drops of yellow food coloring. Spread or pipe over your cooled Yellow Velvet Cheesecake for an even more eye-catching and decadent dessert.
Step 9: Decorate and Enjoy
Dress up your cheesecake with a flourish: a sprinkle of white chocolate curls, a dash of lemon zest or gold dust, and some vibrant fresh berries will take your Yellow Velvet Cheesecake to bakery-level gorgeousness. Slice and savor every sunshine-soaked bite!
How to Serve Yellow Velvet Cheesecake

Garnishes
The beauty of Yellow Velvet Cheesecake is in its stunning simplicity, but a few thoughtful touches—like snowy white chocolate curls, a twist of lemon zest, or a shimmer of edible gold—can make it truly unforgettable. Try a handful of blueberries or raspberries for bold color contrast and a pop of tartness against the creamy cheesecake richness.
Side Dishes
Because this dessert is so decadent, serve it with something lightly refreshing. Fresh fruit salad, lemon sorbet, or even a sparkling glass of Prosecco all complement the flavors and bring a festive feel. For an afternoon treat, a simple cup of coffee or black tea alongside a slice works wonders!
Creative Ways to Present
Don’t be afraid to get playful! Try cutting the Yellow Velvet Cheesecake into mini bars and serving them on a tiered cake stand for elegant parties, or layer cubes of it in glass jars with whipped cream and berries for picnic-ready parfaits. Even a drizzle of berry coulis or a dollop of lemon curd can transform each serving into something special.
Make Ahead and Storage
Storing Leftovers
Yellow Velvet Cheesecake keeps beautifully in the fridge for up to 5 days. Cover the pan tightly with plastic wrap or transfer slices to an airtight container to keep everything fresh and divine. The flavors actually get even better on the second day!
Freezing
You can freeze this cheesecake, frosting and all! Wrap individual slices in plastic, then foil, and store in a freezer-safe container. Thaw overnight in the fridge for the creamiest texture and enjoy whenever the craving strikes.
Reheating
Your cheesecake is best served chilled, but if you like it just a touch warmer, let slices sit at room temperature for about 20 minutes. Microwaving is not recommended as it may alter the luscious texture and make layers separate.
FAQs
Can I use natural food coloring for Yellow Velvet Cheesecake?
Absolutely! For a subtle hue, try turmeric or a touch of saffron, but start sparingly. Gel food coloring offers the most vivid results, but experimenting with natural colors is always fun, especially if you’re going for a more rustic presentation.
What can I substitute for buttermilk?
If you don’t have buttermilk on hand, mix 1 cup of milk with 1 tablespoon of lemon juice or vinegar and let it sit for 5 minutes. This quick DIY buttermilk will do the trick and keep your cake layer perfectly tender.
Do I have to use the water bath for baking?
The water bath helps prevent cracks and ensures that creamy, smooth layer that makes Yellow Velvet Cheesecake so luscious. If you skip it, bake times may vary and the texture may change, but your cake will still be delicious!
How do I know when the cheesecake is done?
The cheesecake is ready when the center is just set but still has a gentle wobble. It will firm up as it chills. Overbaking can cause cracks, so watch carefully and don’t be alarmed by a slight jiggle—it’s a good sign!
Can I make this recipe gluten-free?
Yes! Substitute your favorite 1:1 gluten-free baking flour blend for the all-purpose flour. Ensure your baking powder and powdered sugar are also certified gluten-free for a safe and scrumptious cheesecake everyone can enjoy.
Final Thoughts
If you’re longing for a dessert that’s as beautiful as it is delicious, Yellow Velvet Cheesecake delivers pure joy in every bright, creamy bite. Take a chance on this recipe—it’s easy to master, a total crowd-pleaser, and guaranteed to bring a burst of sunshine to any table. Happy baking!